The Importance of Network Load Balancing (Part 1): Introduction

February 21st, 2008 1 comment

Hello guys! I’m back to my little cyber space and ready to write about SharePoint stuff again – This time about one of my favorite topics , load balancing. What else can I write about? Seriously! How to improve your relationship with your wife!? 😉 This time I ‘d like to talk about the importance of network load balancing in your development cycle and how it can cause some confusions and potentially unexpected results when you deploy your work to a farm installation. All of us have had prior experiences in which everything works perfectly on our machine, but the minute we deploy our stuff to a customer’s site and we go live , things gets messy. Quite frankly, the mentality that your code is not gonna live on a single machine forever really helps you to look at the bigger picture while you are developing or you’re drawing at the architect’s table. For example……Hey dude! your code is going to be executed in a multi-threaded environment so you got to be careful when caching objects  or , God forbid , caching objects that are not thread safe. Here is another one: Man! iterating through all these list items are not really a good idea, why don’t find a faster approach to retrieve what you want? .Yeah , you keep hearing these advices , some people listen up, improve their coding techniques and some others don’t give a damn. You?…….. okay, okay , I heard ya loooud and clear.I’m happy to hear that you belong to the first group, so let’s relax and slouch down while I’m cooking another SharePoint recipe for you (titled “The Importance of Network Load Balancing”) in my new blog posts series.

Here are the action items that I have in mind at the moment and planning to write about in the upcoming posts:

Part 1) Introduction: This is what you’re right in it!! I don’t really know what to say here. Sounds like Metadata about metadata.

Part 2) Setup: How to setup a load-balanced environment for our testing purposes using Microsoft’s Network Load Balancing technology that is included with Windows 2003 Server operating system. I know NLB doesn’t scale and is not what many organizations utilize to distribute client demands between multiple servers , but that’s not important for our testing purposes (You can always use your intelligence to overcome shortcomings, right?) . No matter what you use for load balancing , these posts would be an interesting tidbit of information that maybe valuable to you.

Part 3) Features , Event handlers and Timer jobs: This is pretty much self-explanatory. In this post ,I would like to talk about the things that you should consider while developing features, event handlers and timers jobs deployed to web farms.

Part 4) Participating in a shared forms authentication : Thankfully, You can have forms authentication in a distributed environment in a farm (or even across multiple applications on a single WFE server). When forms authentication is enabled across multiple applications, users are not challenged to enter their credentials again when switching between those apps. In this post, I will show you how forms based authentication cookie can be shared across multiple web applications even in a load-balanced environment. Yes, you may not need an SSO solution at all and you don’t even know it!

Honestly , it is quite scary when you (as a blogger) announce something like this to your readers whilst you haven’t even written one word of your posts – It is just bunch of thoughts in your mind and experiences . Well, I might come back to this page and move things around a bit, but writing an agenda like this really helps me in two ways:

1) To create a path to follow.

2) To be obliged to come back and get the job done. For me this is even more important than the first one, because a lot of times I have an idea and I think wow! this can turn out to be a great blog post , but I slack and that post never get written. I know I know I’m lazy 🙂

Categories: MOSS 2007 Tags:

Anonymous Users In SharePoint (Part 3) : Welcome Guest

February 10th, 2008 20 comments

In previous posts, I mentioned that I would show you how to extend Solution 1 and 2 by somehow merging them into an existing authentication provider and finally packaging everything into a feature called “Guest Account Enabler”. An obvious benefit to creating a feature is that it makes it optional to have the guest account functionality in your site. In this post and for the sake of brevity, I assume that Internet Zone (Protected by FBA) is the zone that you want to have the Guest Account enabled , but nothing prevents you from changing the code below to extend it to other zones using the same authentication provider as Internet zone.

If you haven’t already read Part1 and Part 2 , here are the links:

The first step is to create our ‘Global.asax’ file. While our ‘Global.asax’ is very similar to the ones shown in Solution 1 and 2 in part 2, it has one important difference. It constructs the ‘Guest’ account only if the relevant feature is activated. Here is the code for new ‘Global.asax’.

  1. <%@ Assembly Name="Microsoft.SharePoint"%>
  2. <%@ Application Language="C#" Inherits="Microsoft.SharePoint.ApplicationRuntime.SPHttpApplication" %>
  3. <script  RunAt='server'>
  4. public void FormsAuthentication_OnAuthenticate(object sender, FormsAuthenticationEventArgs args)
  5. {
  6.         //Extract the forms authentication cookie
  7.         string cookieName = FormsAuthentication.FormsCookieName;
  8.         HttpCookie authCookie = Context.Request.Cookies[cookieName];
  9.         if (null == authCookie)
  10.         {
  11.             // There is no authentication cookie. Check to see if Guest Account feature is activated
  12.             // If Feature is Activated, ValidateUser would return Guest Account Context
  13.             if (Membership.ValidateUser("Guest", ""))
  14.                 {
  15.                     FormsAuthentication.SetAuthCookie("Guest", true);
  16.                 }
  17.         }        
  18. }
  19. </script>

Only one thing needs to be highlighted here: Membership.ValidateUser(“Guest”, “”). I added this condition to ‘Global.asax’ to check to see if the feature is activated or not. As you will see later in this post , ValidateUser() method of our custom authentication provider will return False if the corresponding feature is not activate. As such “Guest Account” security context (FBA token) won’t be constructed for anonymous users in FormsAuthentication_OnAuthenticate and annonymous users will continue to their journey in your site as an unnamed identity as before.

With the ‘Global.asax’ properly coded , the next step is create the a Feature. All Features must contain a Feature definition file, so go ahead and add a new XML file to your project named Feature.xml and add the following code to the file.

  1. <?xml version="1.0" encoding="utf-8" ?>
  2. <Feature xmlns="http://schemas.microsoft.com/sharepoint/"
  3.    Description="Enables a guest account that can be targetted for annonymous users"
  4.    Id="602D09E4-4F0D-4058-951D-55059BA87943"
  5.    Scope="Site"
  6.    Hidden="False"
  7.    Title="Guest account enabler for annonymous users"
  8.    Version="1.0.0.0"
  9.    ReceiverAssembly="CustomAuthProvider, Version=1.0.0.0, Culture=neutral, PublicKeyToken=88ce7fc8bcece008"
  10.    ReceiverClass="CustomAuthProvider.GuestFeatureReceiver">
  11.   <ElementManifests>
  12.     <ElementFile Location="global.asax" />
  13.   </ElementManifests>
  14. </Feature>

Well, our feature declares a FeatureReciever that needs to be coded to take care of some deployment tasks for us. This includes copying our custom ‘Global.asax’ file (declared as ElementFile in ElementManifests node) to the root directory of site that servers incoming traffic from internet (Internet Zone). Here is the FeatureActivated method:

  1. public override void FeatureActivated(SPFeatureReceiverProperties properties)
  2.         {
  3.             SPSite site = properties.Feature.Parent as SPSite;    // get site reference
  4.             SPWebApplication webApp = site.WebApplication as SPWebApplication;
  5.  
  6.             foreach (SPUrlZone zone in webApp.IisSettings.Keys)
  7.             {
  8.                 if (zone == SPUrlZone.Internet)
  9.                 {
  10.                     // The settings of the IIS application to copy global.asax file to.    
  11.                     SPIisSettings oSettings = webApp.IisSettings[zone];
  12.                     // Determine the source and destination path    
  13.                     string sourcePath = string.Format(@"{0}\FEATURES\{1}\", SPUtility.GetGenericSetupPath("Template"),@"\GuestEnablerFeature" );
  14.                     string destPath = oSettings.Path.ToString();
  15.                     File.Copy(Path.Combine(sourcePath, "global.asax"), Path.Combine(destPath, "global.asax"), true);
  16.  
  17.                 }
  18.             }
  19.         }

With the shell of our Feature created , the next step is going to the actual Authentication Provider code and change following overridden methods to support “Guest Account” capability for anonymous users.

  • ValidateUser
  • GetUser
  • GetAllUsers
  • FindUsersByName
  1. public override bool ValidateUser(string username, string password)
  2. {
  3.  //Check to see if Guest Enabler Feature is installed and activated
  4.  bool showGuestAccount = Utils.IsSiteFeatureActivated(HttpContext.Current, "602D09E4-4F0D-4058-951D-55059BA87943");
  5.  if (username == "Guest" &amp;&amp; showGuestAccount) return true;
  6.  //the rest of your code to validate non-guest users goes here
  7. }
  1. public override MembershipUser GetUser(string username, bool userIsOnline)
  2. {
  3.   //Check to see if Guest Enabler Feature is installed and activated
  4.   bool showGuestAccount = Utils.IsSiteFeatureActivated(HttpContext.Current, "602D09E4-4F0D-4058-951D-55059BA87943");
  5.   return Utils.GetUserByFilter(this.Name,this.ConnectionString,Utils.UsersFilter.UserName,username,showGuestAccount);
  6. }
  1. public override MembershipUserCollection GetAllUsers(int pageIndex, int pageSize, out int totalRecords)
  2. {
  3.   //Check to see if Guest Enabler Feature is installed and activated
  4.   bool showGuestAccount = Utils.IsSiteFeatureActivated(HttpContext.Current, "602D09E4-4F0D-4058-951D-55059BA87943");
  5.   return Utils.GetUsersByFilter(this.Name,this.ConnectionString,Utils.UsersFilter.Empty,null,pageIndex,pageSize,out totalRecords,showGuestAccount);
  6. }
  1. public override MembershipUserCollection FindUsersByName(string usernameToMatch, int pageIndex, int pageSize, out int totalRecords)
  2. {
  3.   //Check to see if Guest Enabler Feature is installed and activated
  4.   bool showGuestAccount = Utils.IsSiteFeatureActivated(HttpContext.Current, "602D09E4-4F0D-4058-951D-55059BA87943");
  5.   return Utils.GetUsersByFilter(this.Name,this.ConnectionString,Utils.UsersFilter.UserName,usernameToMatch,pageIndex,pageSize,out totalRecords,  showGuestAccount);
  6. }

Three things need some explanation in the preceding code snippets.

  1. I have used couple helper methods in the above code snippets which is included below.
  2. You need to virtually construct the ‘Guest Account’ as a MembershipUser object in GetUser() when this method is called.
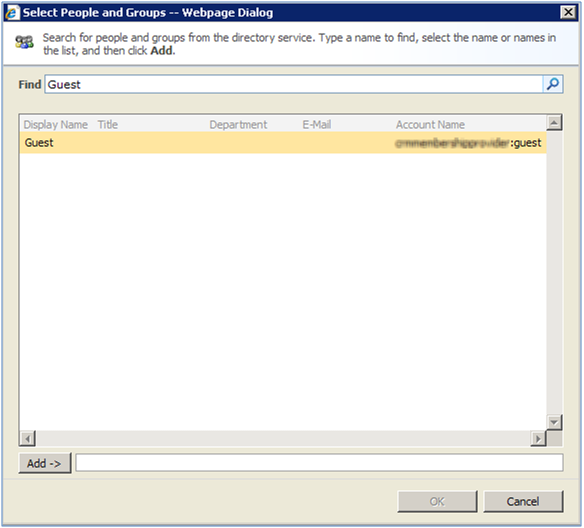
  3. You need to add the ‘Guest Account’ to the MembershipUserCollection in GestAllUsers() and FindUsersByName() so “People Picker” can resolve that account for targeting content or assigning permission purposes.
  1. public class Utils
  2.     {
  3.         public enum UsersFilter { Email, UserName, Empty }
  4.         public static bool IsSiteFeatureActivated(HttpContext context,string featureID)
  5.         {
  6.             SPWebApplication app = SPWebApplication.Lookup(new Uri(context.Request.Url.AbsoluteUri));
  7.             using(SPSite site = app.Sites[0])
  8.             {
  9.                 SPFeature returnsiteFeatures = site.Features[new Guid(featureID)];
  10.                 return (returnsiteFeatures != null ? true : false);
  11.             }                                
  12.          }
  13.         //Create a MembershipUserCollection consisting of our single user.
  14.         public static MembershipUserCollection AddAnnonUserToMembershipCollection(string procviderName, MembershipUserCollection users)
  15.         {
  16.             users.Add(new MembershipUser(procviderName, "Guest",
  17.             "Guest", string.Empty, string.Empty, string.Empty, true, false,
  18.             DateTime.MinValue, DateTime.MinValue, DateTime.MinValue,
  19.             DateTime.MinValue, DateTime.MinValue));
  20.             return users;
  21.         }
  22.         public static MembershipUserCollection GetUsersByFilter(string procviderName, string connectionString, UsersFilter filter, string value, int pageIndex, int pageSize, out int totalRecords, bool includeGuestUser)
  23.         {
  24.             MembershipUserCollection resultUsers;
  25.  
  26.             // Code to get All users based on the filer specified and populate resultUsers collection goes here (removed for code brevity)
  27.  
  28.             //Check to see if you need to add Guest account to the collection
  29.             if (includeGuestUser)
  30.             {
  31.                 totalRecords += 1;
  32.                 return AddAnnonUserToMembershipCollection(procviderName, resultUsers);
  33.             }
  34.             else
  35.                 return resultUsers;
  36.  
  37.         }
  38.         public static MembershipUser GetUserByFilter(string providerName, string connectionString, UsersFilter filter, string value, bool includeGuestUser)
  39.         {          
  40.             if (value == "Guest" && includeGuestUser)
  41.                 return new MembershipUser(providerName, "Guest", "Guest", string.Empty, string.Empty, string.Empty, true, false, DateTime.MinValue, DateTime.MinValue, DateTime.MinValue, DateTime.MinValue, DateTime.MinValue);
  42.  
  43.             //rest of your code to get non-guest user goes here
  44.          
  45.         }
  46.     }

Once you have created all of the required pieces and deployed your feature in a solution package (not explained in this post), then you will see that our Feature in the Features collection as shown below:

Go ahead and activate the feature. You will notice that the ‘Global.asax’ of your internet zone is replaced with your own custom one and subsequently any anonymous calls will be executed under the security context of our virtual ‘Guest Account’. If you disable the feature everything goes back to normal life.

Feature is activated
 
Guest Account is resolved in all zones
 
People Picker shows Guest Account
 
Feature is deactivated
 

This pretty much concludes my three-part series on Anonymous Users in SharePoint. Hope you have found them useful.

Categories: MOSS 2007 Tags:

Anonymous Users In SharePoint (Part 2) : Solutions

February 8th, 2008 7 comments

In Part 1 of this series, I gave you a quick tour of how to enable anonymous access and explained some of the issues regarding anonymous access in both Authoring and FBA zones. In this post I am going to walk you through some of the solutions and workarounds and also the drawbacks of each approach. In part 3, I am going to put everything together and come up with a more real life solution.

Solution 1:This solution is probably the easiest one to overcome the limitation that anonymous user is not a real configurable identity in FBA zone. It is all about making SharePoint think that anonymous user has logged in under the security context of whatever you construct in ‘Global.asax’ .Yes, the ‘Global.asax’ file in the FBA protected site must be modified, so that the ‘Application_AuthenticateRequest’ event (To authenticate the caller) knows how to construct a valid cookie and assign it to the current unnamed identity (anonymous user). This will be later used by the SharePoint downstream authorization process to define what level of access control an anonymous user has to various resources across your site. You simply add the Guest account to your identity store and replace ‘Global.asax’ of your FBA site with the one below and BINGO! anonymous users will show up as “Guest”. Now , You can target content at “Guest” and you can assign permission. Easy, huh?

This solution can be found here . Here is the gist of it – implemented in ‘Global.asax’ :

  1. <%@ Assembly Name="Microsoft.SharePoint"%>
  2. <%@ Application Language="C#" Inherits="Microsoft.SharePoint.ApplicationRuntime.SPHttpApplication" %>
  3. <script RunAt='server'>
  4.     protected void Application_AuthenticateRequest(Object sender, EventArgs e)
  5.     {
  6.         string cookieName = FormsAuthentication.FormsCookieName;
  7.         HttpCookie authCookie = Context.Request.Cookies[cookieName];
  8.         if (authCookie == null)
  9.         {
  10.             FormsAuthentication.SetAuthCookie("guest", false);
  11.         }      
  12.     }
  13. </script>

Drawbacks : First of all It only works in FBA zones. Secondly, many people may not want to add that Guest account in their identity store (for whatever reason) so that would be ideal if we could somehow virtually create that Guest Account. This will lead us to the second solution.

Solution 2: This solution is actually an extension to the above solution by leveraging a custom authentication provider behind the scenes and by virtually creating the Guest context (It’s called Annon in that post). As I alluded to earlier , the whole point here is not to have a Guest Account in the underlying identity store instead virtually creating it at runtime. This POC is very well documented so there is no point for me to reinvent the wheel. Go ahead and read up for yourself, but make sure that you come back and read the rest of this article 😉

Drawbacks : Like the first solution it doesn’t solve the issue we saw in Part 1 with regards to NTLM or Kerberos protected sites , it is only for FBA protected sites period . On the other hand, it is a proof of concept (actually a brilliant one) , but in reality you have to merge this POC into your already developed custom authentication provider , right? Otherwise what’s the point of having an authentication provider that only returns one user (Annon user)?! Plus , that would be great if we could package the whole damn thing into a feature that can be turned ON and off that gives you more flexibility. In part 3, you will see how I will combine all these solutions to make a much more kind of production ready functionality.

Solution 3 : Wrap the content in SPSecurityTrimmedControl and then you should be able to target it to different SPBasePermissions or AuthenticationRestrictions. In the example below, the entire web part zone is surrounded with SPSecurityTrimmedControl tag with PermissionsString set to CreateSSCSite (Self-Service Site Creation) . The “CreateSSCSite ” permission is common to the “Members”, “Owners” and “Visitors” group permission levels, but is not set for the “Limited Access” permission level which is assigned to anonymous users permission level. As you can see, thumbs-up picture doesn’t show up for anonymous users.

  1. <sharepoint:spsecuritytrimmedcontrol runat="server" permissionsstring="CreateSSCSite">
  2. <webpartpages:webpartzone runat="server" frametype="TitleBarOnly" id="Left" title="loc:Left">
  3. <zonetemplate>
  4. <webpartpages:imagewebpart runat="server" verticalalignment="Middle" allowedit="True" allowconnect="True" connectionid="00000000-0000-0000-0000-000000000000" title="Site Image" isincluded="True" dir="Default" backgroundcolor="transparent" isvisible="True" alternativetext="Microsoft Windows SharePoint Services Logo" allowminimize="True" exportcontrolledproperties="True" zoneid="Left" id="g_60b6aa26_dd7b_4973_aaa0_ece2f2110920" horizontalalignment="Center" imagelink="/_layouts/images/thumbsup.jpg" exportmode="All" allowhide="True" suppresswebpartchrome="False" chrometype="None" framestate="Normal" missingassembly="Cannot import this Web Part." allowremove="True" helpmode="Modeless" frametype="None" allowzonechange="True" partorder="1" description="Use to display pictures and photos." __markuptype="vsattributemarkup" __webpartid="{60B6AA26-DD7B-4973-AAA0-ECE2F2110920}" webpart="true"></webpartpages:imagewebpart>
  5. </zonetemplate>
  6. </webpartpages:webpartzone>
  7. </sharepoint:spsecuritytrimmedcontrol>

Default zone (Authenticated User)

Default Zone (Annonymous User)


FBA zone (Authenticated User)

FBA Zone (Annonymous User)


Drawbacks : The main drawback of this approach is that it is mainly useful for content targeting and anonymous users still cannot fully interact with document libraries as we discussed in Part 1. CreateSSCSite is also not granted at “Quick Deploy Users” which means people in that group will also treated like anonymous users. If you can live with that limitation then this solution can be an option for you.

Categories: MOSS 2007 Tags:

Anonymous Users In SharePoint (Part 1) : Introduction

February 4th, 2008 61 comments

These days many public-facing sites allow users to view pages and perform some limited actions anonymously against various functionalities those site offers to their audience. Turning on anonymous access really requires thorough considerations and planning in advance because everyone visiting your site will be able to access the landing page at minimum and from there they have limited access to other parts of your site. This potentially can lead to a situation in which unauthenticated users can contribute to your site to an extent, use up server resources, discover users personal information and the content that you may not want them to be exposed to the public. Fortunately, in both Moss and WSS , you not only have the option to enable/disable anonymous access , you also have a fantastic granular control over how anonymous user experience should be when interacting with your site. This makes it a lot easier to turn a SharePoint site to a public-facing site exposed via internet which was one of the main goals in WSS 3.0 and MOSS 2007. In this article, I would like to give you a quick tour of how to enable anonymous access and what issues you or your anonymous users might face during this exercise. In part 2, I will be writing about some of the existing workarounds and solutions and finally in Part 3 I will be demonstrating how to turn them all into an even better (more real life) solution by coding the missing parts.

Through out these articles I assume that you have a basic understanding of forms based authentication (a.k.a FBA), you have created a site in default zone (a.k.a authoring zone) and extended it to an Internet zone (a.k.a public facing zone). Your default zone in protected either by NTLM or Kerberos and your internet zone is using a custom authentication provider. Now that you are ready , let’s get rolling!

Anonymous access must be granted at the web application level at the time that you create the web application and zones. It is a check box that you select and the end result is a <allow users=”*”/> element that is added to the web.config of the Zone for which anonymous access is enabled. Yes, you can always go back and enable or disable this by going to “Authentication Providers” page in Central Admin as illustrated in picture 1.

Picture 1

Here is what would be added to the web.config when anonymous access is enabled.

  1. <authorization>
  2. <allow users="*"></allow>
  3. </authorization>

For anonymous users to be able to get to your SharePoint site via internet they have to cross two barriers:

I) IIS barrier : As I alluded to earlier, IIS barrier is handled in the web.config when you set up the zone to allow anonymous access in Administration Site.

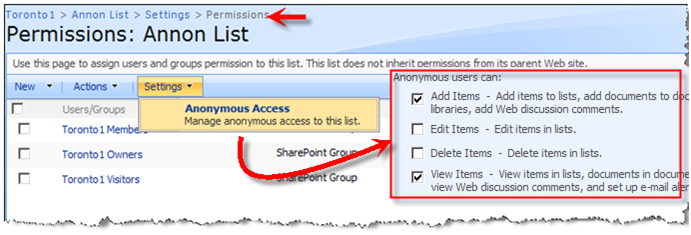
II) SharePoint barrier : Site Administrators have to tell SharePoint to allow anonymous access by browsing to http://yoursite/_layouts/setanon.aspx and granting the right access control for anonymous users (Picture 2). You need to repeat this for all sites unless permission inheritance is turned on.

NOTE: if the <authorization> tag is not present in the web.config, then setannon.aspx has all its options grayed out.

Picture 2

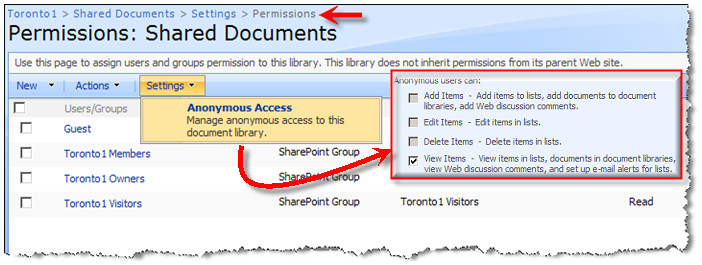
In additions to the settings in setannon.aspx page , each document library or list has separate settings for anonymous users in order to control how they can access and interact with the content.

Document Library :

Picture

Custom List (Called Annon List):

Picture 4

As saying goes, the devil always lies in the details. Okay , what are the problems regarding the annonymous users in SharePoint? I am glad that you asked!

1) Anonymous access relies on the anonymous user account on the web server (IUSR anonymous account).

  • In an FBA scenario where users are authenticated against a custom identity store and not AD , there is not a real configurable identity for anonymous user. This makes audience targeting at anonymous users (MOSS only) a bit challenging. For example when showing a web part targeted at people who have not signed in or a message shown to anonymous users only.
  • Even in the default zone where IUSR anonymous account can be resolved, audience targeting at this account won’t work.

2) No matter what kind of permissions you grant to your anonymous users , there are still some restrictions when they interact with your site:

  • Anonymous users can not upload, edit or attach files in Document libraries including Wiki libraries. This applies to both your authoring zone (which is always supposed to be protected by Windows Integrated Authentication) and FBA zone such as Internet zone. Look at the picture 3 above and note how some of the options are grayed out by default.
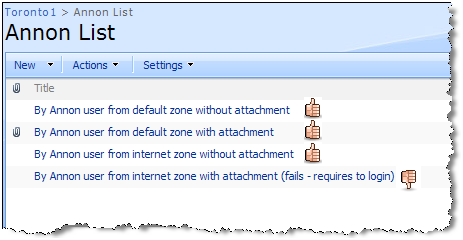
  • Anonymous users can not fully contribute to Lists, discussions or surveys. For example , they cannot attach files to the list items (FBA zone only). As shown in the picture 4 above , in custom lists you can specify that Anonymous users CAN add items to a list. Well, an item might include an attachment right? , but in actuality when they attach a file to the item they will be redirected to a log in page. It simply means that they CAN NOT. 😉

I have tried above limitations in our custom list and for both zones. below is the result:


Picture 5  

I don’t really mean to insult your intelligence , but just as FYI , thumbs are not part of the List – I just added them to the picture to show you which operations went through without requiring anonymous user to log in 🙂

3) (Credit to Doug Ware – See his comment below and his post here) Turning on anonymous access in one zone has the unfortunate behavior of giving all authenticated users the same rights as an anonymous user on all of the zones in the web application.I (as Doug Ware :)) encountered this recently when I had one zone set up that did not allow anonymous access and the Restricted Read permission level. I extended the site to another zone and configured it for anonymous access to the entire site. The members on the original zone were then able to browse the list because the configuration gave them more rights than Restricted Read even though the zone they were using was not configured for anonymous access! Based on my reading of the documentation it was by design.

Now that you know some of the issues with regards to anonymous access in SharePoint, let me walk you through couple of solutions in part 2.

Categories: MOSS 2007 Tags:

Presenting at DevTeach/SQLTeach Toronto 2008

January 30th, 2008 27 comments

DevTech team has released the name of final speakers and their topics here and it seems that I also made the cut to speak at this event. DevTeach / SQLTeach Toronto 2008 will be the biggest developer, DBA and ITPro conference in Canada. It’s jam-packed with advanced sessions (level 300 and 400) all on the latest versions of Microsoft products and technologies. I am presenting two topics in the SharePoint track:

1) Accessing External Data Sources Through SharePoint:

Imagine that your SharePoint sites must contain structured data in a high volume and you need to perform complex queries and actions against it. Obviously, there are pros and cons of storing such information in SharePoint lists or in a custom SQL database. Realistically speaking, neither of these approaches alone nor Business Data Catalog (a.k.a BDC) is the answer to all of your data integration woes. You like the versioning, approval, bulk editing , rich UI and other good features that SharePoint lists offer but you are also concerned about the performance of your complex cross-list queries, CAML limitations (like ‘join’ , ‘Select distinct’) and optimized searching. You need to provide a common metadata repository and a hybrid framework for accessing external data sources through SharePoint utilizing all your options including BDC, Data View Web Part and custom code to keep both data structures in sync. In this session I will show you how you can surface information from your backend databases into your SharePoint sites, when to keep structured data in SharePoint lists and when not and eventually how in real world implementation you will end up combining all your options to come up with a robust solution with much better performance!

2) Forms based authentication in SharePoint with the SQL Server membership provide :

In ASP.NET 2.0 , there is an important concept called provider model which is used for many new feature such as Membership/Role Management, Profiles, etc. SharePoint is built on the top of ASP.NET 2.0 which means it can utilize everything that ASP.NET 2.0 offers including SQL Membership provider. In this session learn how to set this up, get yourself familiar with issues/workarounds, managing your custom profiles and finally how to leverage this solution for exposing your SharePoint sites to external users. This is an advanced session, targeting both IT Pros and Developers and attendees will receive fully commented source code with step-by-step walkthroughs for the exercises shown during demo.

Categories: General, MOSS 2007 Tags: