Document Set Creator Web Part
When working with content types we all can agree that the user interface that SharePoint provides is not the most intuitive one. Specifically when creating a new document set! The problem is that the document set is a complicated concept for the end users to digest. The complexity of SharePoint user interface for working with document sets adds to this complexity!
Complexity makes your SharePoint solutions seem too hard and casts doubt regarding how practical they are.
Imagine a page the shows a list of content types, their approval tasks, and maybe some other web parts. The add new item link provided by the List View web part does not allow users to create Document Sets. The way to work around this is to click somewhere on the list view to get the ribbon menu to show up, then click on New and select the Document Set from the drop down. That would be so many clicks, and for sure the end users wont like it!
Solution: To make life easier you can create a single click button to do this instead. This button is simple and intuitive to use. The solution is to takes advantage of SharePoint client side object model (CSOM) to create a new item. The screenshot below shows this button on a Web Part page.

Here is the main code for the Web Part.
<style type=”text/css”>.ms-uploadbtnlink { width: 300px; }</style>
<div style=”width: 100%” align=”center”>
<div class=”ms-uploadbtnlink”>
<button onclick=” javascript:NewItem2(event, ‘<%= DocSetDetails %>’);return false;” type=”submit”><nobr>
<img alt=”Upload a Document” src=”/_layouts/Images/uploaddoc.png”/>  <span><%= ButtonLabel %></span></nobr>
</button>
</div>
</div>
In the code behind the Document Set Details are created and passed into the NewItem2 function.
DocSetDetails = “” + SPContext.Current.Web.Url + “/_layouts/listform.aspx?ListId=%7B” + List.ToUpper().Replace(“-“, “%2D”) + “%7D&PageType=8&RootFolder=” + rootFolder.Replace(” “, “%20”) + “&ContentTypeId=” + ContentType;
Highlighted are the List ID (ListId) and Content type (ContentType).
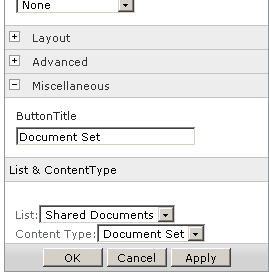
It’s possible to create this solution using a content editor web part or directly injecting the JavaScript code in the page, but the point is to develop it once and reuse many times over, so instead of changing the html and dealing with url encoding and IDs, create a Web Part with a tool part that allows you to select the list and the content type you want to use.
You can download this Web Part from Codeplex : https://docsetter.codeplex.com/