Working with Structured Data in Microsoft Office SharePoint Server 2007 (Part3): Browser Enabled InfoPath Forms
Summary: Explore different options you have to work with structured data in a high volume while you need to perform complex queries and actions against such data ranging from authoring, approval and landing information on Web Part pages, all the way down to the physical storage. This blog post is part 3 of a blog post series that I am planning to write on this topic. (31 printed pages)
See Also:
- Part 1 : Configuring Single Sign On Service and Database
- Part 2 : Exposing LOB Data
- Part 4 : SharePoint Designer
Applies to: Microsoft Office SharePoint Server 2007, Microsoft Office Info Path 2007
Download this post in PDF version here.
Content:
- It’s all about reusability
- Create a Data Connection Library
- Create a data connection in InfoPath connecting to Products Web service
- Design the form
- Publish the form to Office SharePoint Server 2007
- Testing the solution
- Working with InfoPath form data
- enabled InfoPath forms and SSO
- Additional links
It’s all about reusability
One of the most important characteristics of a well-designed application is reusability. In my first exposure to InfoPath, I was drawn to the product for exactly the same reason. I was excited to see a completely schema-based solution which would give me the ability to design the schema outside of the InfoPath authoring tool, import the schema into my InfoPath form and create an electronic form based on that specific schema.
Alternatively, I realized that I could design an InfoPath form, extract its schema and reuse it all over my application – for examples in my workflows, event handlers or any other bits of my application that can potentially interact with my InfoPath forms.
| Important |
| For an in-depth look into how to use InfoPath forms in SharePoint, see Chapter 14: Electronic Forms in MOSS 2007 in Professional SharePoint 2007 Development , by John Holiday |
By introducing Data Connection libraries and Universal Data Connections files (a.k.a UDC file) in MOSS 2007, Microsoft took the reusability goal to the next level. Data Connection libraries were designed with one primary objective: to abstract data connection settings in UDC files from the form template and store it in a location either relative to the root of the site collection or in a central location in Central administration site as shown in the pictures below.

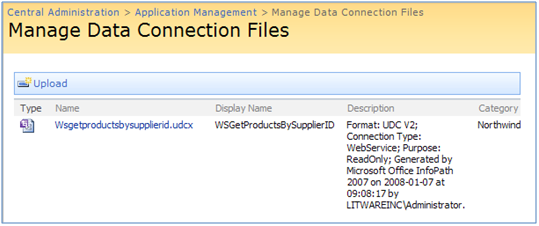
Well, the first obvious advantage of this level of abstraction is reusability. Technically speaking, data Connection library gives you the ability to share the same connection settings across multiple InfoPath forms, site collections or even Web applications when stored in the central administration site. Another benefit is that UDC files can be further customized based on your dev, staging or production environments which in turn means that instead of changing your form template every time you move your InfoPath forms from one environment to another one, all you need to do is to change the settings in a UDC file to match with the new environment configurations and that’s it. You are all set!
Content types are yet another way in which InfoPath forms and SharePoint play very well together. Instead of attaching your form to a specific form library and do it over and over again for other form libraries, you can attach the form template to a content type and reuse it all across your site collection. As matter of fact, reusability is just the most obvious challenge that content types are supposed to solve in the new version of SharePoint; therefore InfoPath is just benefiting from such capability introduced by content types.
| Important |
| Form library is just a special type of document library that has InfoPath form defined as its document template. |
With a tighter integration with MOSS 2007, InfoPath forms offer way more than being just a rich and smart presentation layer on the top of MOSS 2007. InfoPath Forms Services feature of MOSS 2007 makes InfoPath also a browser-based, thin-client solution which allows users to interact with the forms through browser with absolutely no need for client application to be present on users’ machines. Pretty much like any document libraries, in form libraries you have the option to set the forms to render either in InfoPath client or as a Web page in the browser.
1) In a Form Library click on the Settings menu and choose Form Library Settings
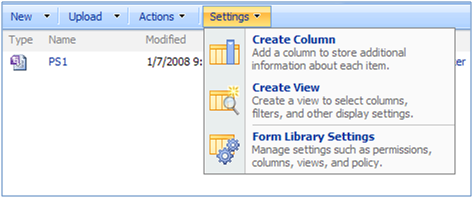
2) In the General Settings section , click on the Advanced Settings
3) Go to the advanced settings
4) In the browser-enabled Documents , choose Display as a Web page

In this blog post, you will learn another way to achieve interoperability between the Office SharePoint Server 2007 platform and your backend systems by following required steps to surface data from a SharePoint list and SQL Server 2008 (through a Web service call) in a master-detail way. Finally, you will see how you can leverage SSO to overcome the double hop issue when consuming your backend data.
Create a Data Connection Library
As mentioned above, we need a central location to store data connections associated with InfoPath forms. We can either convert the data connections (the ones that need to be converted) to UDC files in a Data Connection library located relatively to the site collection or we can put the whole process in the hand of the farm administrator to deal with our form’s deployment process. In this blog post, we only exercise publishing the form to a data connection library.
You can also publish you InfoPath form centrally which would require the farm’s administrator intervention. I won’t walk you through that process simply because this blog post is not about how to deploy InfoPath forms.
So we need a data connection library, right? Let’s create one.
Open Internet Explorer and browse to http://litwaredemo/
1) Click on Site Actions
2) Choose View All Site Content
3) Click on the Create button
4) From the Libraries section choose Data Connection Library
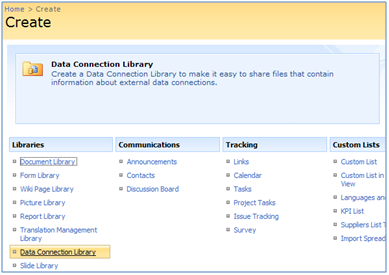
5) Enter NW Trusted Data Connections and Click Create
Create a data connection in InfoPath connecting to Products Web service
When you use a Web service data source in a browser-enabled InfoPath form , especially a Web service that is not virtualized; therefore doesn’t run within the context of SharePoint, there are couple of steps you need to take , otherwise the form may not run correctly when deployed.
In this section, we will first look at how to create a new external data connection to connect to the Products ASMX Web we created in Part 2. We will then convert this data connection to a UDC file and reload it in a brand new InfoPath form to ensure our InfoPath form is pointing to the right data connection file. This UDC file will be bound it to a Drop-Down List Box control (fldProducts) which is going to play the role of a detail control in a master-detail relationship. Let’s follow these step-by-step instructions to build our first data connection.
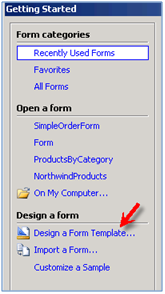
1) Start Microsoft Office InfoPath 2007
2) In the Design a form section of the Getting Started dialog click the Design a Form Template… link
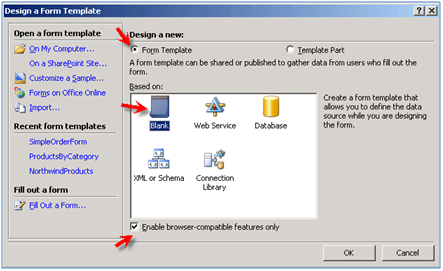
3) Make sure the Form Template option check box is selected. Select the Blank option in the Based on section of the Design a Form Template dialog and click the OK button.
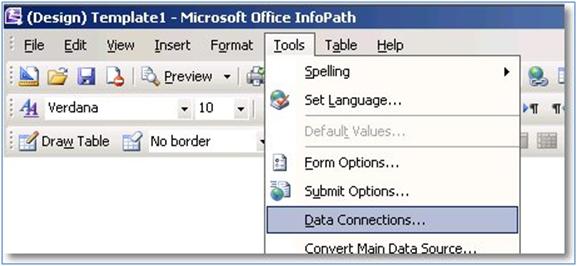
4) Select the Data Connections… option from the Tools menu

5) Click the Add button. Leave the Create a new connection to option selected
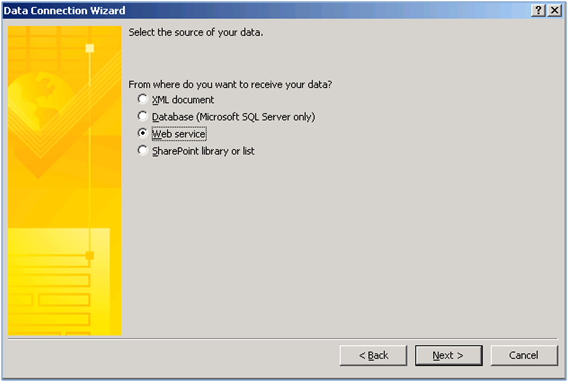
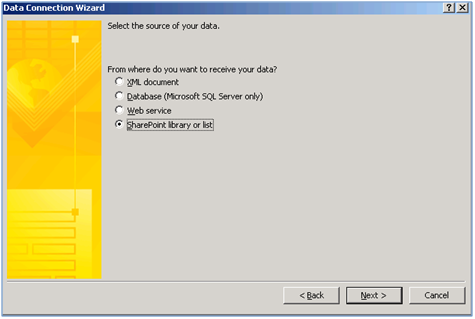
6) Select the Receive Data option and click the Next button
7) Select the Web service option and click the Next button
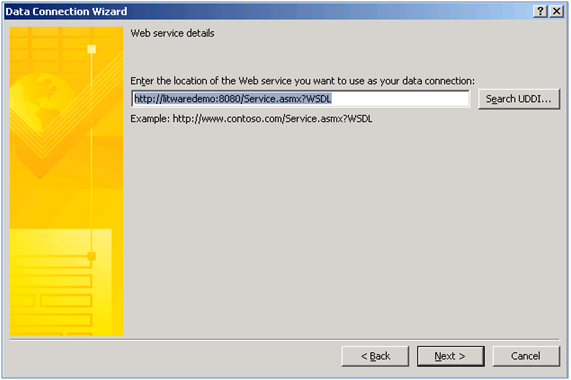
.8) Enter a location of http://litwaredemo:8080/Service.asmx?WSDL (This is the URL of the ASMX Web Service , we created in Part 2). Click the Next button
9) Select GetProductsBySupplierID from Select an operation list. Click the Next button
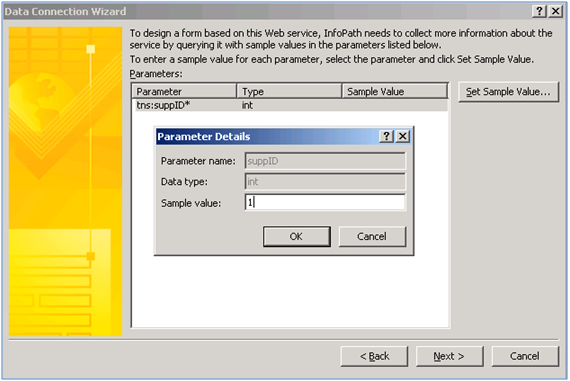
10) Click the Set Sample Value… button and enter 1 in Sample value text box. Basically , by providing a sample value in this step, InfoPath can collect information about the Web service such as the return result. After entering a sample value for the suppID parameter, click Next.
11) Clik the Next button again in the next dialog box. Now you should see the following dialog box:

12) Leave the Store a copy of the data in the form template checkbox deselected. We will talk about this option in more details later in this blog post, but for now just click on the Next button.
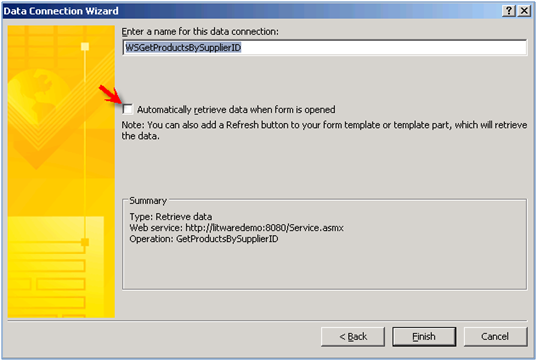
13) Enter WSGetProductsBySupplierID in the Enter a name for this data connection
Make sure that Automatically retrieve data when form is opened is not selected. I will walk you through this option later in this blog post. Click Finish.
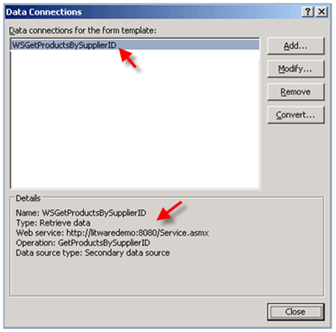
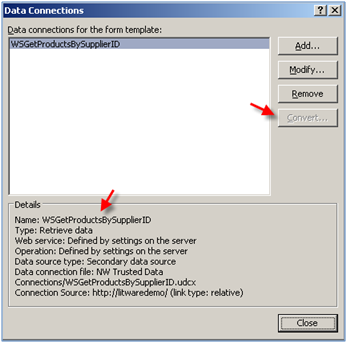
14) Your Data Connections dialog box should look like below. Notice the details section important info about the DCL.
15) With the Data Connections dialog box still open, click on the Convert button. This will open Convert Data Connection wizard.
16) Click on the Browse button and browse to the Data Connection Library we created earlier in this blog post. It should be located at http://litwaredemo/NW%20Trusted%20Data%20Connections.
17) Enter WSGetProductsBySupplierID.udcx in File name and click on the Save button.
18) Choose the connection link type to be “Relative to site collection (recommended)”. Click Ok.
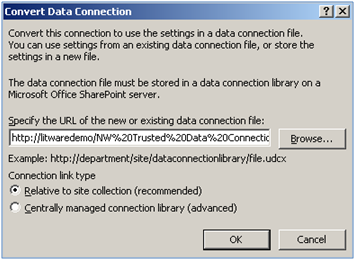
19) Notice how Convert button is disabled. Click on the Close button. We are done!
When you close Data Connection dialog box, do not save this form! We just wanted to use this form to create an external data connection to the Web service. We will have to create another form from the scratch right after this section. Open IE and browse to the Data Connection Library to which we just published our form (http://litwaredemo/NW%20Trusted%20Data%20Connections ).
As you can see approval is by default active in any Data Connection Library which is created at the site collection level. This is a great way for site collection administrators to control existing data connection and approving them , before they can be used in any of the forms published to the site collection. Choose Approve/reject from the drop down menu for the new data connection as shown in the picture below. Choose Approved and click the OK button.
There is one extra step required to complete this section . When you access a webservice from an browser-enabled InfoPath form, from Internet Explorer’s standpoint this is a cross-domain connection and is not permitted unless the end user authorizes it. Unfortunately, HTTP is a stateless protocol so browser-enabled InfoPath form (running in a browser) is unable to stop the server-side code execution of the form in order to prompt the user to authorize the cross-domain call.
Running a form in Full trust bypasses this security check , but for all other security modes this security check is always performed. Thankfully, this behavior doesn’t happen when you open the form in InfoPath client , so for browser-enabled forms that do not run in full trust mode and there is one or more Web service connections , you need to ask the farm’s administrator to allow such connections to be made. Here are the steps:
1) Go to SharePoint Central Admin Site
2) select Application Management tab
3) In the InfoPath Forms Services section, choose Configure InfoPath Forms Services.
4) Check “Allow cross domain access for user templates“.

Design the form
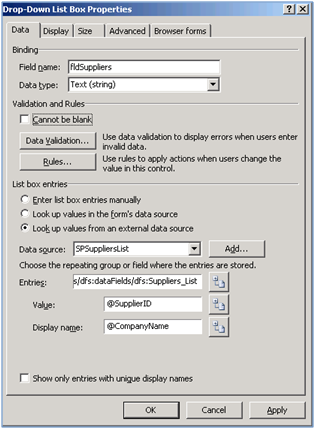
With our Web service connection created and turned into a UDC file, the next step is to design the main InfoPath form that hosts the Web Service connection created above, a new data connection to the SharePoint Suppliers list and finally all of the data controls. The Suppliers list data connection will be bound to a Drop-Down List Box control (fldSuppliers) on the form which plays the role of master control participating in a master-detail relationship.
1) Let’s fire up InfoPath. In the Design a form section (Getting Started dialog) click the Design a Form Template… link
2) Make sure the Form Template option and Enable browser-compatible features only check boxes are selected in the Design a new section of the Design a Form Template dialog. Select the Blank option in the Based on section of the Design a Form Template dialog and Click the OK button.
3) When working with an InfoPath form from the scratch creating data connections is the best starting point, so let’s go ahead and create our second data connection. Select the Data Connections… option from the Tools menu
4) Click the Add button on the Data Connections dialog. Leave the Create a new connection to option selected. Select the Receive Data option and click the Next button .Select the SharePoint Library or list option as shown in the picture below and click the Next button
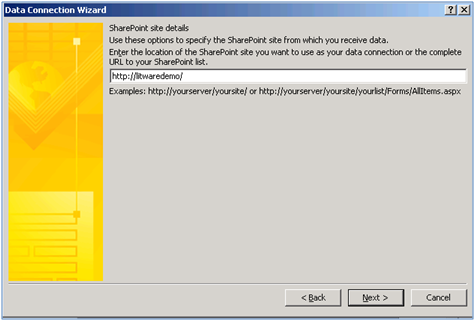
5) Enter the URL of the SharePoint site from which you want to receive data and click Next button
6) Select Suppliers List from Select a list or library section.
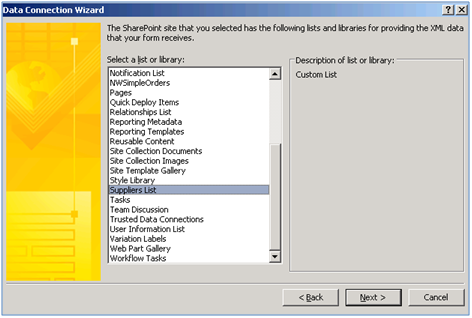
7) Select “CompanyName” from the list and leave all the other fields to be selected in Select fields section. Click Next.

.8) The next step is to decide if you want to Store a copy of the data in the form template. By selecting Store a copy of the data in the form template checkbox, you tell InfoPath to store a static copy of the data from the Suppliers List in the form template. If you look into the form template, you will find the static data stored as an XML file in the form template .Select this option if your form is meant to be used by offline users or its data source is not updated quite often.
9) In the last dialog box, enter SPSuppliersList in the Enter a name for this data connection. Make sure that Automatically retrieve data when form is opened is selected. Click Finish.

10) At this point, your Data Connections dialog box should like below:

11) Without closing this dialog box, click on the Add button. This time instead of creating a brand new data connection;let’s reload the one we built and placed in the Site collection Data Connection Library.
12) Select Search for connection on a Microsoft Office SharePoint Server.
13) Select WSGetProductsBySupplierID.udcx from
14) the NW%20Trusted%20Data%20Connections Data Connection Library.
When our form’s Data Connections library is populated with the right connections to the Web service and SharePoint list, there are 23 steps in total to design the form and place the master details control on it.
1) Add a Drop-Down List Box to the form
2) Right click on the control and choose Drop-Down List Box Properties
3) Modify the name to: fldSuppliers
4) Select Look up values from an external data source
5) Choose SPSuppliersList as the Data source
6) Choose Suppliers_List as the Entries
7) Set the Value to @SupplierID
.8) Set the Display name to @CompanyName
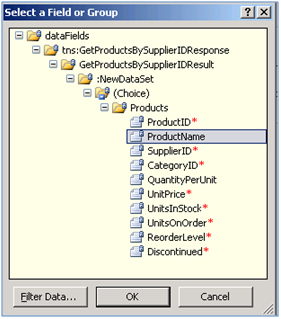
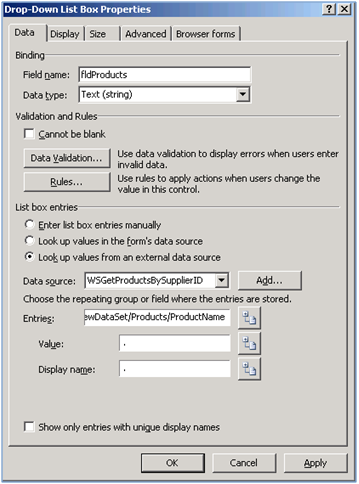
9) Add another Drop-Down List Box to the form
10) Right click on the control and choose Drop-Down List Box Properties
11) Modify the name to: fldProducts
12) Select Look up values from an external data source
13) Choose WSGetProductsBySupplierID as the Data source
14) Choose ProductName as the Entries
15) Do not change Value and Display name. Leave the default values intact
| Important |
| The ASMX Web service , we use in this blog post is installed on the same server as SharePoint and SQL Server , so multiple-hop delegation issue won’t happen. If you are following these steps and you install your Web Service and/or SQL Server on different machines than SharePoint and you also happen to be using NTLM , then you need to think about extra hops that may occur between your InfoPath form , Web Service and SQL Server. For more information see Configuring SSO in Part 1 or Brower enabled InfoPath forms and SSO later in this blog post. |
16) Add a Text Box to the form
17) Right click on the control and choose Text Box Properties
18) Modify the name to: fldReview
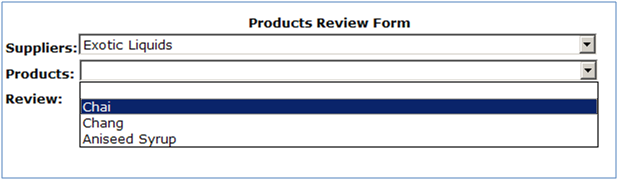
19) Design view of the form should be something like below

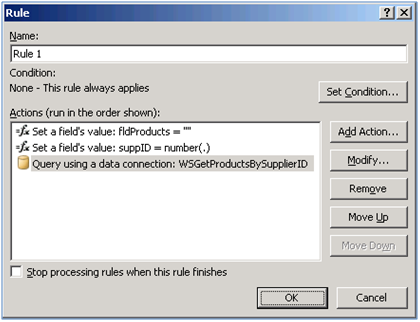
20) Right click on the first Drop-Down List Box (fldSuppliers) and choose Rules.
21) Create a new Rule with the following actions (with No condition):
| Important |
| Adding conditional or non-conditional rules directly to the data elements of your form is one of the three possible ways you can add more power to your forms. You can also write scripts embedded in the form or alternatively, you can use VSTO (Visual Studio Tools for Office) or VSTA (Visual Studio Tools for Applications) to write managed code that is called from a separate assembly. |
- Set a field’s value: Set the fldProducts field to nothing (e.g. leave the Value blank)
- Set a field’s value: Set the parameter value (suppID) for the WSGetProductsBySupplierID secondary data source to the fldSuppliers field. Since fldSuppliers will return a string , you need to apply number() function to cast it to integer.
- Query the WSGetProductsBySupplierID data connection
22) At this point, you can click on Preview button to see the form in action.
23) Save the form locally as MasterDetailForm.xsn. This xsn file is what is referred to as form template. In nutshell, it is just a zip file that contains all different tenants of your form.
| Important |
| There is an important distinction between saving and publishing a form template. Before publishing your form template, you need to save it first. Publishing your form make it available for distribution. |
Publish form to Office SharePoint Server 2007
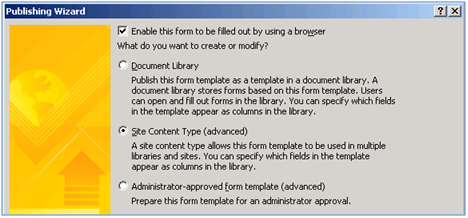
Once you have finished designing your form template, you can begin the form deployment process by first publishing the form template to a location, either the local hard disk or a SharePoint site. The Publishing Wizard guides you through the publishing process while providing good amount of information to help you choose the right location for the form template. The location options are the following:
- To a SharePoint server with or without InfoPath Forms Services
- To a list of e-mail recipients
- To a network location
- As an installable form template (requires Microsoft Visual Studio)
In this blog post, we will publish our form template to a SharePoint site.
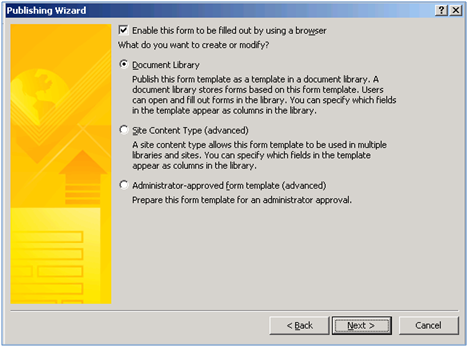
1) Select the Publish option from the File menu

2) Click the Next button to publish To a SharePoint server with or without InfoPath Forms Services
3) Enter a location of http://litwaredemo/ and click the Next button
4) Click the Next button to publish to a Document Library
| Important |
| If there was any managed code in the form’s code behind, the Publishing Wizard only allows the Administrator-approved form template option, so don’t be surprised if you see Document Library and Site Content Type are disabled. |
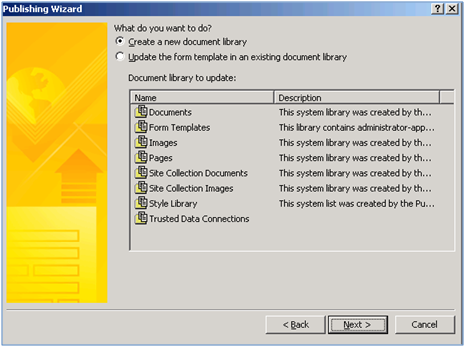
5) Choose Create a new document library or choose a form library , that you have already created in the site , from Document library to update list
6) Click the Next button to create a new document library
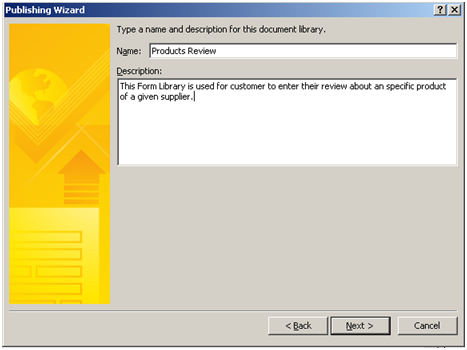
7) Enter a Name of NWSupplierProducts and click the Next button
.8) Click the Next button, then Publish button .
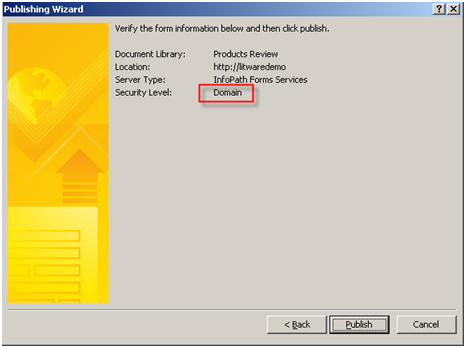
In the picture shown above, there is one thing that needs to be highlighted: Security Level. If you select Form Options… option from the Tools menu and go to the Security and Trust category, you will see that Automatically determine security level option is selected by default and it is set to Domain.
This security level is what InfoPath has determined is appropriate for our form based on the data sources we have created. Domain security mode means that the form can access content from only the domain in which it is located. In case you need to elevate the security mode to Full Trust and get the administrators involved in the publishing process, unselect Automatically determine security level option, select the Full Trust option in the Security Level section, select the Sign this form template option and finally click the OK button.
9) In the last screen , select the Open this document library option. Click the Close button to finish the Publishing Wizard.
10) Browse to Products Review, from Setting menu choose Form Library Settings
11) In General Settings section, choose advanced settings.
12) In Browser-enabled Documents section , select Display as a Web page.
Testing the solution
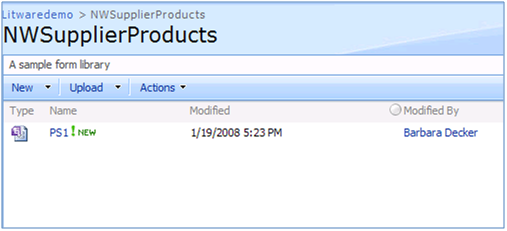
1) Open Internet Explorer and browse to http://litwaredemo/ProductsReview
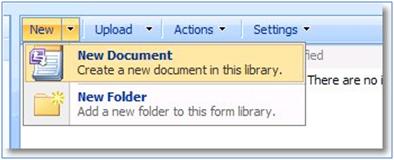
2) Select the New Document option from the New menu
3) InfoPath Forms Services will load your form in the browser
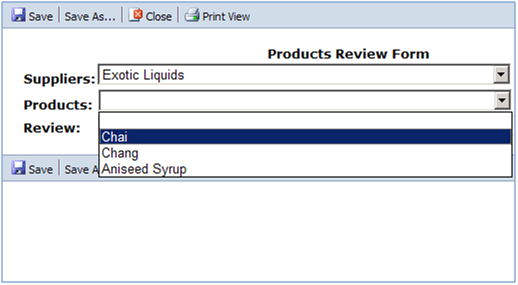
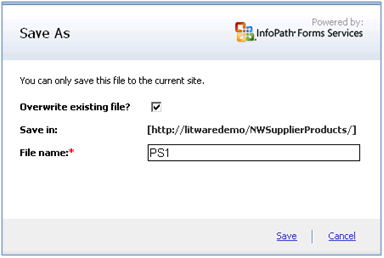
4) Click the Save Button to save the data.
Working with the InfoPath form data
Okay, back to our reusability related discussion in the beginning of this blog post. Form libraries in SharePoint are one of best examples of how a form’s schema can be reused.
Simply put, when you publish a form to a form library, you attach your form as the default template for that from library. When someone creates a new document, they fill out the form and save the result as xml into the form library either via InfoPath client or a browser-enabled representation of the form provided by IFS. The xml that is stored in a form library conforms to the form’s schema, so technically any code, as long as it confirms to that schema, can intercept this xml file and extract the information needed.
When users complete their forms, all of the accumulated form data is available to you for reporting and further analysis. In the solution provided in this blog post, InfoPath form is directly saved in the form library. This is a good approach if you want to work with all the data in the form. Remember, every time you save a new form to the form library, a new list item is created, so you can access the xml data via the SPFile object associated with each list item, parse that xml (using XPath, XSLT,etc) to extract the fields you need. This can be done in two ways:
- Inside your form library. An event handler or workflow can be written to access the SPFile object and extract the xml data for further processing such as writing them to another list or to a separate database.
- Outside of your form library. Your code sitting outside of the form library (i.e. in a timer job) can access the SPFile objects associated with list items and extracts the xml data for further processing.
In addition to parsing the xml data (for example using XPath) , there is another interesting way to extract the xml data out of a submitted InfoPath form using .Net serialization.
- Save your form template (*.xsn) to a folder
- Temporarily change the file extension to “.cab”
- Double-click the CAB file, it will open as an archive file and you can locate the primary schema (“.xsd”) file and drag it out
- Create.Net (C#, VB, J#) wrapper classes from the xsd file using XSD.EXE (command line).
- In your code, submitted InfoPath xml data (accessed by SPFile object) can be accessed and de-serialized to objects of these classes. Here is an example of a serializable class that can be generated from this blog post’s InfoPath form primary schema file.
Okay, what you saw above definitely requires some coding, but is there a way that you can work with form data directly rather than having to extract it? Answer is: Yes. During the publishing process, you are given the option to simply promote your form’s fields to SharePoint site columns and then work directly with the column data.
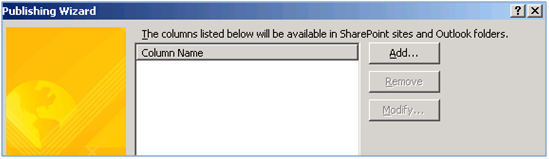
Click on the Add… button and specify which data elements of your form should be promoted to which SharePoint site columns. Publishing process then introduces the form’s schema to the form library. Okay, what is that necessarily? This is required because Form library has some extra work to take care of, after the form is saved. It needs to intercept the result xml file, extract the values and copies them to the list columns. Guess what? In the new version of InfoPath, Form data fields are now bi-directional meaning that it goes both way from InfoPath form to the list columns and vice versa. Isn’t that cool?
Alternatively, you could let InfoPath create a site content type that is linked to the form template. When you choose to add this content type to a document library, in fact you promote your form’s data elements to the columns of that document library. Then, your forms data will be rendered in columns.
Browser Enabled InfoPath Forms and SSO
In Part 1, it was discussed that SSO can be set for individual, group, or group using restricted credentials. A browser-enabled InfoPath form (like Data Form Web Part – see Part 3) can use either individual or group. In case you want to use individual credential mapping (like how we configured our App def in Part 1), you have two avenues to take:
- Administrator must enter account information for every user into the SSO database. In another word, each user must be mapped to the SSO account individually.
- You can implement a solution for an individual form or a set of forms so when a user browse to a form , a check must be done to see whether the connecting user has their credentials stored in the SSO database or not. If not, there should be a mechanism to redirect the user to a credentials management page where user can enter the credentials. A proof of concept for this approach has been developed. For more information, see Appendix: Creating an ASP.NET Page to Redirect Users Who Are Not in the SSO Database
Okay, no matter you use group or individual account types in SSO , you still need some work to do before get this all working.
1) Open IE and browse to the Data Connection Library the contains the UDCX file
2) Right click on the UDCX file for which you want to setup SSO and Save Target As…
3) Open the file in notepad
4) Locate <udc:ConnectionString>… </udc:ConnectionString>element
5) Replace it with the following :
<udc:ConnectionString>
Provider=SQLOLEDB.1;Password=<CredentialValue Class=”Password” Resource=”sso:Northwind” Type=”Password” />;Persist Security Info=True;User ID=<CredentialValue Class=”User ID” Resource=”sso:Northwind” Type=”Username” />;Initial Catalog=Northwind;Data Source=LITWAREDEMO;Use Procedure for Prepare=1;Auto Translate=True;Packet Size=4096;Workstation ID=LITWAREDEMO;Use Encryption for Data=False;Tag with column collation when possible=False
</udc:ConnectionString>
6) Uncomment the following authentication block<!–udc:Authentication><udc:SSO AppId=”” CredentialType=””/></udc:Authentication–>
7) Enter your SSO application definition file information.
<udc:Authentication> <udc:SSO AppId=”Northwind” CredentialType=”NTLM” /></udc:Authentication>
.8) Upload the new UDCX file back to the Data Connection Library
9) Approve the UDCX file
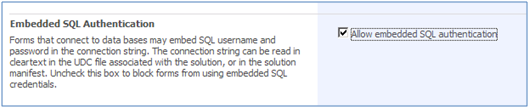
10) In central administration site, browse to Central Administration > Application Management > Configure InfoPath Forms Services and enable the following checkbox. Notice that this potentially can cause security threads to the underlying data structures so it should be used with extra cautious.

In case, you want to connect to Northwind database using SQL Authentication instead of Windows Integrated Security (NTML). There are five steps that you should follow to get this working:
1) Connection string block in UDCX file should be changed to :
<udc:ConnectionString>
Provider=SQLOLEDB.1;Password=<CredentialValue Class=”Password” Resource=”sso: NorthwindSQLAuth ” Type=”Password” />;Persist Security Info=True;User ID=<CredentialValue Class=”User ID” Resource=”sso:NorthwindSQLAuth” Type=”Username” />;Initial Catalog=Northwind;Data Source=LITWAREDEMO;Use Procedure for Prepare=1;Auto Translate=True;Packet Size=4096;Workstation ID=LITWAREDEMO;Use Encryption for Data=False;Tag with column collation when possible=False
</udc:ConnectionString>
NorthwindSQLAuth in Resource=”sso: NorthwindSQLAuth ” is the name of enterprise application definition you setup in SSO service for SQL authentication . Username in Type=”Username” and Password in Type=”Password” are what you have specified in Field1 and Field2 of the SSO Application Definition.
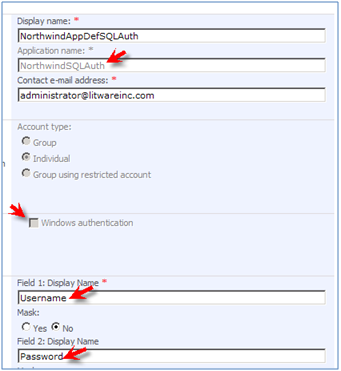
2) In Manage Account Information for an Enterprise Application Definition page , map your users to a SQL account that you have already created in SQL Server 2008 and you have given that account required permission to access Northwind database. For example map , LITWAREINC\Barbarad to Username=NWUser , password =pass@word1
3) SSO block in UDCX file should be changed to:<udc:Authentication><udc:SSO AppId=’ NorthwindSQLAuth ‘ CredentialType=’Sql‘ /></udc:Authentication>
4) Important : In the SSO application definition ,Windows authentication checkbox must be deselect to allow both SQL Auth and Windows Auth to be established from client components (in this case , an InfoPath form)
5) Important: In forms configuration settings, Allow embedded SQL authentication is selected. Note that using embedded SQL credentials,will cause some security vulnerability in UDCX files as people can embed credentials in clear text.
Additional Resources


Hi Reza, This is a great post.
I have to implement Single Sign On (SSO) in my MOSS environment.
In my SharePoint Site, i have to provide a link, which opens up an oracle(CMIC) thirdparty web application (Opens in a new window).
I have to pass on my credentials to this application as well while opening it up. Currently it requires manual inputting the credentials again.
In our client environment, everybody was forced to use the same windows credentials for the Oracle Application aswell.
So my requirement is to just pass the logged in user credentials as parameters while opening the oracle web application (while clicking the link).
your post gave me some insight on SSO.
Can you point me or show some way to implement this?
Thanks a lot in advnace
I would like to build a sharepoint site fo the generation of documents. I would like to use an Infopath form for the request – I will request attachements of required suuporting data. If the documents are not attached it will go back to the requestor as a new task with comment – I would like thia to be page 2 of the initail request (form) – and have multiple pages to the form. Is this possbile? The multile pages will repressent various levels of tasks in the process.
Thank you in advance!