Archive

Archive for the ‘SharePoint 2010’ Category

Plain End User Story: Creating a SharePoint Meeting Workspace in Outlook

July 19th, 2010 No comments

This seems to be a pretty straightforward thing, but I’ve been hearing this one question a lot recently:

How can I create a SharePoint meeting workspace in Outlook 2010?

Typically, you create the meeting workspace in SharePoint first, and then link to it in outlook or you can create the meeting request and the workspace both at the same time in outlook. In Outlook 2007, the button to create a meeting workspace was right there on the ribbon. However, in outlook 2010 it was decided to hide it for whatever reasons. To add the button back to the Quick Access Toolbar (QAT) and create a SharePoint meeting workspace, you need to take the following steps:

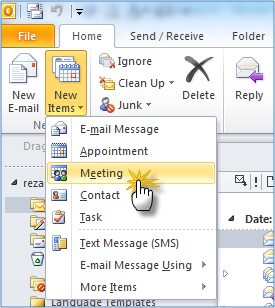
Create a new Meeting in Outlook:


Click on the Customize Quick Access Toolbar and from the popular Commands, select the Meeting Workspace. Next, Click on the “Add >>” button.

072010-0308-plainsharep2.png 

Fill out the required information for your meeting request: 

072010-0308-plainsharep3.png

Now, click on the meeting workspace button you just added to the QAT:

072010-0308-plainsharep4.png 

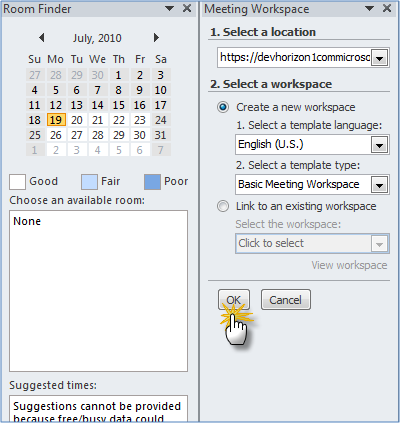
This will open a new pop up window where you should type in the URL of your SharePoint Site (SP2010 or 2007 both works just fine in Outlook 2010): 

072010-0308-plainsharep5.png

Click Ok (You may be asked to enter your credentials and authenticate to the site you are trying to create the workspace). At this point you should see the site and a bunch of other options available to you. Click Ok again.


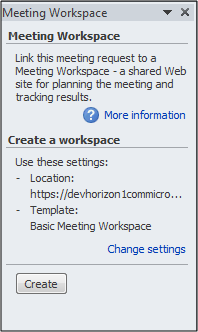
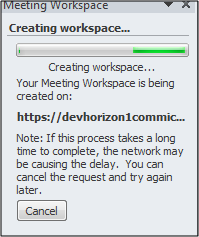
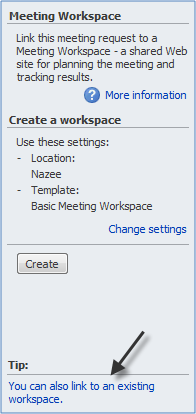
This will take you to the confirmation pane where you need to click on the Create button to create the meeting workspace in SharePoint.


Once the workspace is created, a link will be included within the body of the meeting request. When you send the meeting request, the attendees can click on the link to browse to the meeting workspace.

072010-0308-plainsharep9.png

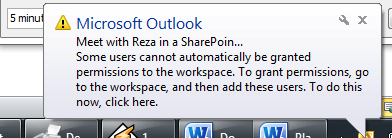
Obviously, you should have already given the attendees the required permission to access the workspace in SharePoint. Don’t worry, Outlook is smart and enough SharePoint aware to forewarn you about that by showing a nice little notification to you.


Below is the meeting workspace I created in my BPOS SharePoint site in Outlook 2010:

072010-0308-plainsharep11.png 

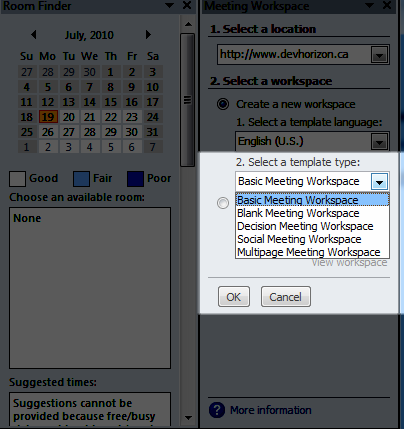
Sure enough, when you create a SharePoint 2010 meeting workspace, you will get many more template options for your meeting workspaces, as shown in Figure below:


And here is a Social Meeting Workspace I created in one of my SharePoint 2010 sites:

072010-0308-plainsharep13.png

One thing is worth mentioning here though! Once you create one meeting workspace in your Outlook, you can link to that workspace for future meeting requests if needed:


Happy Organizing!

Categories: MOSS 2007, SharePoint 2010 Tags:

SharePoint 2010: Creating Custom List Definitions that Use InfoPath Forms

June 14th, 2010 10 comments

The general requirement is a “round-trip” of the form you want to add or replace. Before adding or replacing forms in a WSP, they need to be published. Once the form is in a WSP, it can be imported into any Visual Studio project (i.e. a project that defines a custom List definition) and reused. When you publish the form, URLs in the XSF file can be relativized, and other content can be added/removed from XSN components as required by the publish process. We’re proposing the following, for example, when replacing a WSP form:

1. Open the WSP in Visual Studio
2. Locate the XSN in the WSP (there is a standard structure for both list and form library forms).
3. Download a copy of the XSN from SharePoint server using SPD, or make a copy of the XSN that is currently in the WSP.
4. Make the required modifications to the XSN in the InfoPath Designer application
5. Publish the form back to SharePoint
6. Download the XSN from SharePoint using SPD.
7. Replace the XSN in the WSP
8. Repackage/deploy the WSP

That’s the general “life-cycle” and practice. The process below is touching on deploying a SharePoint list form:

If you’ve already upsized a list, before importing the Site WSP into Visual Studio, the XSN will exist in the WSP and can be modified. There is also a process for adding a form to a list definition in a WSP which involves several manual steps. At a high level, the latter involves:

1. Add the XmlDocument to the Schema.xml (under List instances)
2. Under the Modules node, add a new Module (Item_):

  • Name: Lists<name>Item_
  • Modify the Elements.xml file.
  • Remove the “Sample.txt” file added by VS.
  • Add Folders under the created module and add the XSN template so that the path matches the one described in the Elements.xml file

3. Add the Item_pages Module:

  • Name: Lists<name>Item_pages
  • Get the List ID (On the SharePoint server, the link to Add a new list item contains the List ID, it can be copied from there.) <- this step might not be necessary, the deployment process  doesn’t match the list by ID but by name, any GUID would do as long as it’s unique.
  • Ensure the sharePointListID attribute (under the sharepointListAdapterRW node) on the manifest.xsf file matches the GUID “id” value for the Elements.xml file created in this step.
  • Add the property bag to the _pages node.
  • Requires: vti_eTag: maps to the uniqueID for the folder “Lists\<name>\item”.  –> More specifically: PropertyBag refers to the properties of the “item” folder.

4. Add a property bag per item to the modules, one for each:

  • Template.xsn
  • Displayifs.aspx
  • EditIfs.aspx
  • NewIfs.aspx

On the “Features” node add the Modules created before (step 2 & 3: Lists<name>Item_   & Lists<name>Item_pages)

That’s it!

Categories: SharePoint 2010 Tags:

Note to Self: The Difference between SPWeb.SiteGroups & SPWeb.Groups

May 26th, 2010 2 comments

This came up a few times and I seem to forget it after a while:

  1. SPWeb.SiteGroups: As the documentation says this gets you a collection of cross-site groups for the site collection. These groups are cross-site, because they can be used in more than one SPWeb object in the site collection.
  2. SPWeb.Groups: This returns a subset of the groups above (SPWeb.SiteGroups) that are used in the specified SPWeb object. The word “used” is important to note here. These are the groups that are referenced somewhere in the site. For example, in a securable object such as an SPList or SPListItem with broken inheritance.

So, the logical conclusion is that:  SPWeb.SiteGroups >= SPWeb.Groups.

Categories: MOSS 2007, SharePoint 2010 Tags:

Canada Security Conference-Sector 2010: I am speaking!

May 24th, 2010 No comments

I am pleased to announce that I will be speaking at the Canada’s  Security Conference-Sector 2010. The conference will be held here in Toronto from October 25 to October 27, 2010. Here is my talk: Moving to the new security model in SharePoint 2010: claims-based authentication.

You can register for Sector 2010 here.

Categories: SharePoint 2010 Tags:

BI Center and Data Connection Errors When Using PerformancePoint Dashboard Designer

May 3rd, 2010 8 comments

A common way to display your BI assets in SharePoint 2010 is to use a site template called Business Intelligence Center. The Business Intelligence Center (a.k.a BI Center) is the enhanced version of the Report Center in MOSS 2007. The site template includes many of the BI capabilities that Microsoft has introduced in SharePoint Server 2010 all packaged into a single site. Although using Business Intelligence Center is not the only way to access SharePoint’s BI features,this site template can provide a central location for teams and departments within your organization to store, retrieve, and modify shared reports, dashboards, Excel workbooks and etc.

Recently, I have been busy creating and migrating some PerformancePoint dashboards to SharePoint 2010. During the migration process, I came across a couple of weird errors in the Dashboard Designer which I thought to highlight in this blog post:

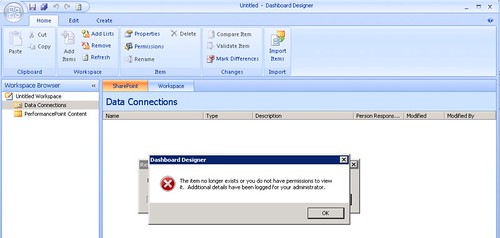
Error #1) You lunch the Dashboard Designer Click-Once application and try to create a new data connection,and then you get the following error:

“The item no longer exists or you do not have permissions to view it. Additional details have been logged for your administrator”
Windows Event Viewer Log Entry: Microsoft.PerformancePoint.Scorecards.BpmException: The item ‘http://splab/BICenter/Data Connections for PerformancePoint/AdventureWorksDW_ADCube.odc’ is not a valid PerformancePoint Data Source. Check to make sure the content type of this item is correct. at Microsoft.PerformancePoint.Scorecards.Store.Dao.DataSourceSPDao.ValidateFile(SPListItem item) at Microsoft.PerformancePoint.Scorecards.Store.Dao.SPDocDao.Get(ISPFcoCache cache, Guid webSiteID, RepositoryLocation location, SPListItem item)

Cause:It turned out that prior to launching the Dashboard Designer, I had uploaded an Excel Workbook to the BI Center and the Workbook’s data connection file was added using the PerformancPoint Data Source content type. This is a normal behavior, because PerformancPoint Data Source content type is the default content type in the library. Unless you explicitly specify which content type to assign to your data connection file,the default content type will be picked up and assigned to an uploaded file. So, when Dashboard Designer is lunched from within the BI Center , first, it attempts to resolve this data connection (AdventureWorksDW_ADCube), which is obviously not a valid PerformancePoint data connection, but an *.odc file used in a published Excel Workbook.
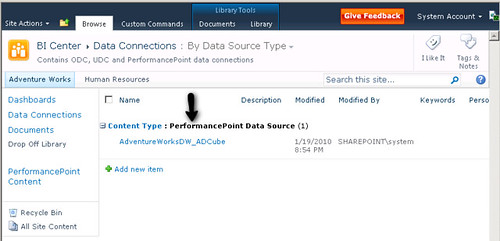
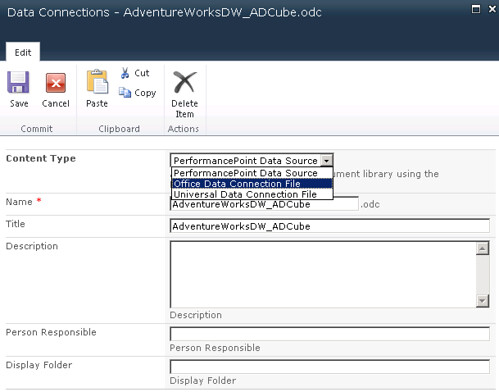
Resolution: Edit the data connection file and assign the right content type to it, as in my case it was : Office Data Connection File.
Error #2) You launch the Dashboard Designer Click-Once application and create a new data connection.
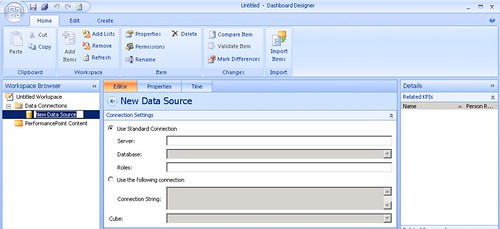
When you specify the name of the server and after you select the database to connect to, you get the following error:

“The query could not complete because the data source “New Data Source” is not in a PerformancePoint trusted location”
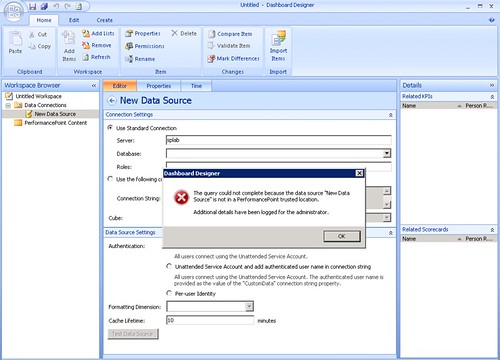
Windows Event Viewer Log Entry: The query could not complete because the following items are not in a PerformancePoint trusted location: New Data Source The shared service administrator must configure the following content locations as “trusted”: The shared service administrator must configure the following data source locations as “trusted”: /BICenter/Data Connections for PerformancePoint Trusted Locations can be configured for the PerformancePoint Service Application by using PowerShell Cmdlets or through SharePoint Central Administration. PerformancePoint Services error code 22002.

Cause: The Data Connection Library in the BI Center is not added to PerformancePoint trusted locations by default.

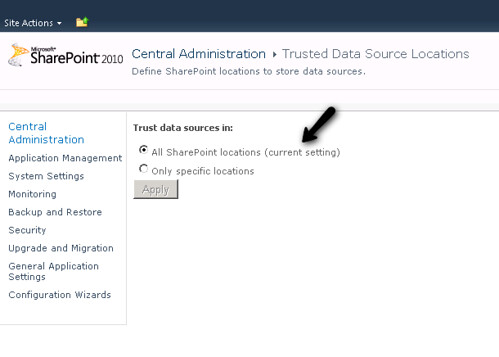
Resolution: As indicated by the Windows log entry,you need to add the URL of the Data Connection Library to the list of trusted locations.See this page for more information.
Error #3) You launch the Dashboard Designer Click-Once application and attempt to connect to a database , but no database shows up in the Database drop-down list.

You switch to the “Use the following connection” option and you specify the following connection string:

[Xml]
Provider=MSOLAP.4;Integrated Security=SSPI;
Persist Security Info=True;Initial Catalog=
Adventure Works DW 2008R2;Data Source=.;
MDX Compatibility=1;Safety Options=2;
MDX Missing Member Mode=Error
[/Xml]

And you get the following error:

The Unattended Service Account “” does not have permissions to see this data. Additional details have been logged for your computer.
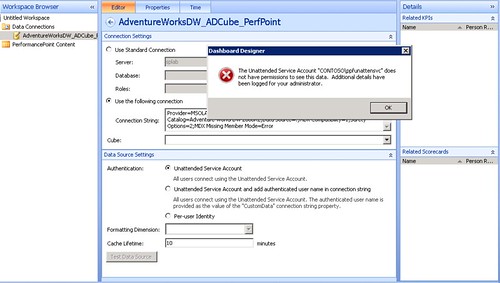
Windows Event Viewer Log Entry:Microsoft.AnalysisServices.AdomdClient.AdomdErrorResponseException: Either the user, CONTOSO\ppfunattensvc, does not have access to the Adventure Works DW 2008R2 database, or the database does not exist.

Cause: PerformancePoint Unattended service account has permission to connect to the database.

Resolution: Ensure that the PerformancePoint unattended service account has permission to the SQL Server instance where the database exists or the database itself.Once the permissions are granted, the database should show up just fine in the list of available databases.

Last but certainly not least, if you are connecting up to a SSAS cube, you need to make sure the PerformancePoint unattended service has access to the cube and the underlying data warehouse.
Categories: SharePoint 2010 Tags: