Archive

Archive for the ‘SharePoint 2010’ Category

Lead Author of Professional SharePoint 2013 Development Book

September 8th, 2012 3 comments

I am excited to announce that I have been working with Wiley Publishing as the lead author of a new book named “Professional SharePoint 2013 Development“. We put together a great team of well-known authors to deliver the best-in-class content for customers who are planning to build and implement enterprise scale solutions using SharePoint 2013 products and technologies.

The book starts with a great chapter on architectural changes in SharePoint 2013, then it will cover the new and improved areas. For the rest of the book you will see hands on, real life chapters focusing on major SharePoint 2013 features and workloads like ECM, BCS, Search, BI, Cloud and Social.

We have started working on this book for a few months. Just like our SharePoint 2010 version, we are working hard to be the FIRST book that comes to the market!

The book is now available for preorder on Amazon:

http://www.amazon.com/Professional-SharePoint-2013-Development-Alirezaei/dp/1118495829

Categories: SharePoint 2010, SharePoint 2013 Tags:

Quick Guide: Transitioning from BPOS to Office 365

July 1st, 2012 2 comments

1) First, make sure the transitioning process is completed and you have received an email from Microsoft confirming it. This is important!

2) Uninstall old BPOS SSO App from Control Panel > Programs > Uninstall a Program

3) Login to https://portal.microsoftonline.com. This is the new URL for the company portal instead of the old URL.

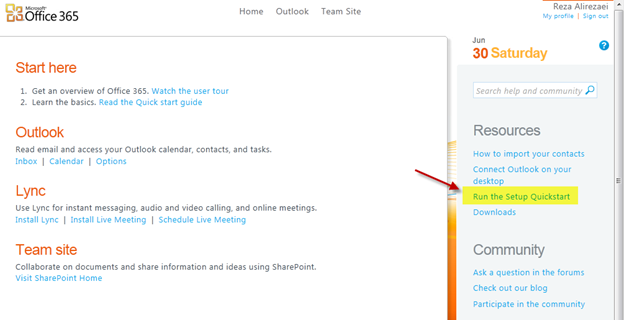
4) From the right navigation choose “Run the Setup Quick start”

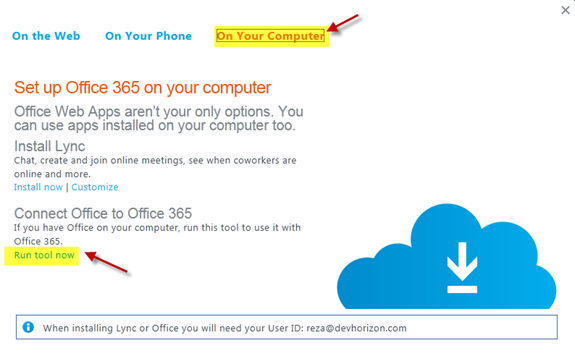
5) Click on “on Your Computer” link on the top and then click on the “Run tool now” link on the bottom of the screen.

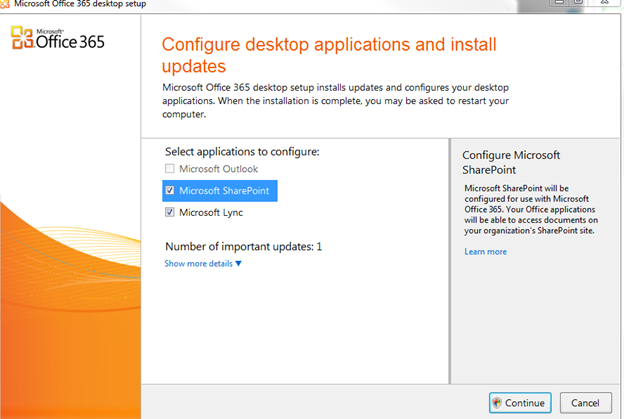
6) A click-once application will be deployed to your machine which will talk you through the installation, configuration and transitioning process of Office 365 on your desktop.

As you can tell, Outlook doesn’t need to be re-configured and the wizard will automatically switch your default BPOS-enabled email address to its Office 365 migrated one. All other non-default BPOS accounts must be configured manually.

This wizard also installs “Microsoft Online Services Sign-in Assistant” in your computer:

Note that unlike BPOS SSO App, Microsoft Online Services Sign-In Assistant is now a Windows Service.

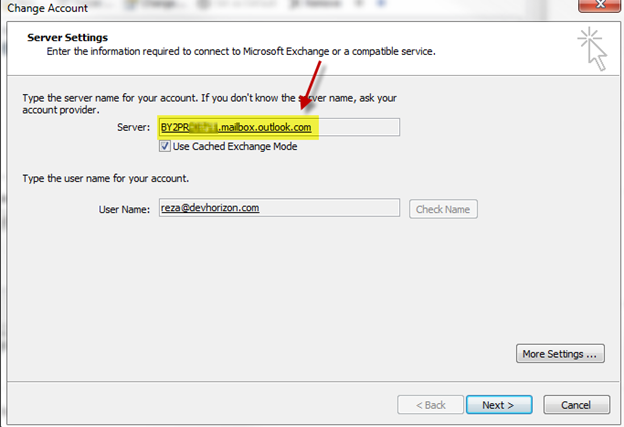
7) Once you have gone through all the steps in the wizard, open outlook and confirm your default email account has been switched to the new Exchange Server address:

You may also need to perform some manual steps to configure Outlook. See the official guidance here : http://help.outlook.com/en-US/140/ms.exch.ecp.useoutlookanywhere.aspx

If you have setup the CNAME record for outlook auto discovery, make sure you test your email auto-discovery here first, by choosing “Microsoft Office outlook Connectivity Tests” and then “outlook AutoDiscover” as shown below:


.8) If you have more than one email accounts, configure them manually through Control Panel > Mail > Email Accounts. Make sure you use the same server name (as shown in step 7) and proxy server settings automatically configured for your default account by the wizard.

9) Browse to http://mail.office365.com to verify your Outlook Web App is working fine. BPOS OWA should now look like cars from 1970s to you. doesn’t it?

10) One-time configuration by network admin: Prepare your domain for new Lync online as discussed here: http://onlinehelp.microsoft.com/en-us/office365-enterprises/hh416761.aspx

11) Browse to https://portal.microsoftonline.com again and click on My Profile link on the top right corner of the page. This where you update your contact information and upload your picture. Your picture must be under 100K and in JPEG format.

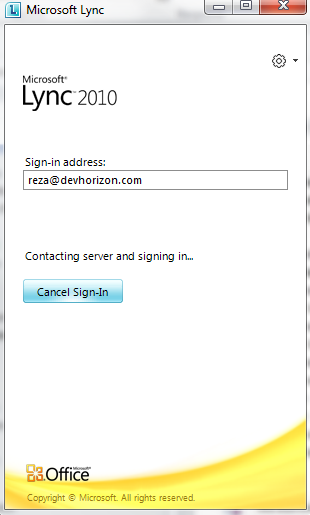
12) Open Launch Lync 2012 and enter your username. No additional steps is required:

That’s it! You are all set; enjoy all the new features of Office 365 on your desktop and your mobile device.

Check out my favorite features in Office 365 here.

Categories: SharePoint 2010 Tags:

Policy Enforcement Solutions in SharePoint

July 1st, 2012 No comments

In SharePoint, the concept of policy enforcement is different than security.Security features of the product are used to stop people from accessing secured information and policy enforcement solutions are there to control and limit what users can do with the information once they gain access.

The following figure shows how security and policy enforcement solutions in SharePoint work hand in hand to help you protect and secure your information:


At a very high level, security features of SharePoint are handled at three stages:

1) Authentication : A process in which users prove they are who they claim to be. Typically, SharePoint externalizes its identity management business to other technologies like IIS, Active Directory, SQL Server, Windows Identity Foundation (WIF) and Forefront Identity Management (FIM), to name a few, and relies on standards and identity metasystems like SAML, Trust, Federation to enhance  information security, and enable interoperability.

2) Authorization: Once a user is authenticated and gains access to a SharePoint site, what they can do in the site is important and is primarily determined by a separate process called authorization. SharePoint uses security groups and its extensible permission levels to perform authorization and to adjust a user’s access level to various objects such as sites, subsites and information in those containers. Note that you can use Claims to make authorization decisions in SharePoint too, but that’s out of the scope of this discussion.

3) Security Inheritance : SharePoint security model is designed based on the concept of inheritance . Just as an FYI, inheritance has nothing to do with writing your will or your grandchildren taking over your properties! Most of objects in SharePoint such as sites and documents can inherit the security permissions of their parents or they can have their own security scheme.

Audience Targeting is not a security feature in SharePoint. It has never meant to be like that either! It’s a CSS hack to hide/unhide and to tailor information to specific group of people (an audience group) and should never be used as a mechanism to secure content.

Once a user passes the security barriers mentioned above, there are two primary policy enforcement solutions in SharePoint to further control what needs to happen to the information they consume and interact with:

Information Management Policy: Information Management Policy is a set of rules that define certain behaviours or restrictions on information stored in SharePoint (only to information stored in SharePoint). For example, auditing accessing and modifying secured information is a popular need for many departments such as HR which can be easily implemented using Information Management Policies.

It’s important to note that information management policies in SharePoint can also be used in other use cases such as labeling and retention which has nothing to do with securing information.These policies are created and put in place to ensure your organization stay compliant. What makes Information Management Policy a powerful solution to enforce your organizational policies is that you can create your own custom policies or plug in 3rd party solutions to SharePoint. It’s an extensible framework!

Information Rights Management: People often confuse Information Management Policy with Information Rights Management. Well, they may look the same but they’re two different technologies with a little bit of overlap! I will cover the overlaps in future posts.

One problem with enforcing policies through Information Management Policy is that it only captures and intercepts user interactions with information kept in SharePoint. How the interaction is done is not important. It could be  through Office Clients or Office Web App or even the browser, but the information has to stay in SharePoint in order for the policy to applly. Once the information is taken offline (i.e. download), there is no way to apply those policies to local copies.

Unlike Information Management Policies which is purely a SharePoint-y solution, Information Rights Management policies apply to both online and offline information and works across the board in SharePoint, Office client apps, SharePoint Workspace, Office Web App and Exchange, regardless of where the information is stored and how it is accessed.

Here are a few scenarios that an organization can benefit from using Information Rights Management :

Scenario

Usage

Highjack-Proof Information HR managers can choose to protect downloads from certain HR sites, sections or sub-sections. When a user attempts to download a HR document, system will verify that the user has permissions to the given file, and issues a license to the user that enables their access to the document. System will then download the document to the user’s computer in an encrypted, rights-managed file format which is valid for that user only. If the information is stolen from that user’s computer or secretly copied to another computer, the hijacker won’t be able to open the document.
Online-Only Information HR managers can choose that some information can only be viewed online and only a subset of authorized users can print them and create hard copies.
Information Licensing HR managers can choose the number of days for which the license is valid. After the specified number of days has passed, the license expires, and the user must download the file again from the HR site
Premature Information Disclosure HR managers can choose to remove information protection after a certain date. For example, HR managers may want to make certain information public when off-boarding process for an employee is completed. Before such a date, however, they want to restrict access to such information to prevent premature disclosure.

In the next blog post, we will talk about Information Rights Management in more details.

Categories: MOSS 2007, SharePoint 2010 Tags:

Office Web App Licensing Quick Guide

May 9th, 2012 2 comments

I get these questions a lot:

  • What does it take to be properly licensed for Office Web Apps?
  • Are Excel Services, Visio Services and Access Services part of Office Web App offering/licensing model?
  • What is the difference between Word Web App and Word Automation Services, as well as between Excel Web App and Excel Services?

Let’s talk licensing first. Office Web Apps have no dependency on your SharePoint licensing model; instead they are licensed with Office 2010 Professional Plus and Office 2010 Standard licenses. If you have volume license for either Office Professional Plus or Office Standard, then you are already licensed for Office Web App. Install the bits on your SharePoint 2010 server or SharePoint Foundation server and enjoy the life…The difference is Office Professional Plus includes the license for SharePoint workspace  which standard doesn’t! Office Web Apps only covers the required licenses for Word Web App, Excel Web App, PowerPoint Web App, and OneNote Web App.

Note that Excel Web App is not Excel Services, though they can compliment each other! Excel Services, Word Automation Services, Visio Graphics Service and Access Services are part of SharePoint and licensed with SharePoint , not Office!  For example, to use Excel Services you need to either have SharePoint Enterprise CAL (a.k.a eCAL) or the Enterprise license for Internet sites.

The following table summarizes everything making these murky matters look simpler hopefully:

Included in Office 2010 Professional Plus Licensing? Included in Office 2010 Standard Licensing? Included in SharePoint Enterprise Licensing? Included in SharePoint Standard Licensing?
Excel Web app
 
Word Web App
 
PowerPoint Web App
 
OneNote Web App  
SharePoint Workspace  
Visio Graphics Service    
Access Services    
Excel Services    
Word Automation Services

: Yes

: No

    — : Not Applicable


Another important thing to point out (credit to Craig, see his comment here) is that just because you have Office Pro/Standard licences and install/use Office Web Apps, it only allows those Office licenced users to use the Web Apps. So you shouldn’t be using the Office Web Apps in Internet or Extranet situations unless access is limited to only those Office licenced users. One last thing, in order to purchase an eCAL for SharePoint, you already need to be licensed for standard edition of the product just like Lync 2010. Public rant: Microsoft, please please make licensing easier for people to understand!

Two important resources for you to take a look at:

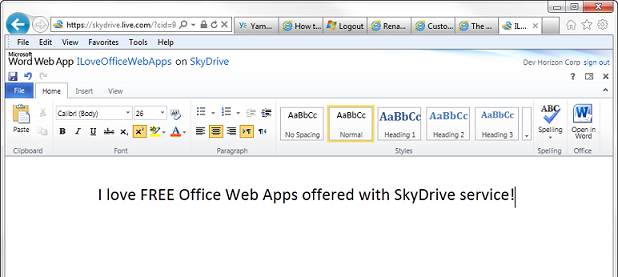
Whatever I have said so far is for Office Web Apps within the security of your corporate firewall. One of the great features of Office Web Apps is that Microsoft offers it as a FREE service as part of their SkyDrive cloud-based storage and file sharing.  Office Web App makes SkyDrive work seamlessly with Microsoft Office files across PC, Mac, Mobile Devices and web.


Here is where things get really sexy: Excel Mashup

  1. Make a model available to public or a selected group of people by uploading your model (in a form of an Excel Workbook) on SkyDrive.
  2. Embded your model into your Web Site
  3. Start programming against that model using Excel Client Side Object Model

Here are a few links to compare SkyDrive (and Office Web Apps) with other similar services:


Categories: SharePoint 2010 Tags:

Adding Additional Farm Admins to an Existing Farm

March 7th, 2012 2 comments

Scenario: You have installed a SharePoint farm and life is great in your company with you being the only person who looks after that farm! Your employer is kind enough to hire a new resource to help you out. You have been asked to make the new hire a farm admin too.

Problem: Adding additional farm administrators is not a straight forward process as the SharePoint central administration site makes it look like! Just by adding the new user to the the farm administrators group in central administration, it means pretty much nothing! Unless you remember to update different security groups here and there, you could be left wasting hours on troubleshooting. To hopefully save you some time and headaches, here is a process to give a user farm admin privileges.

Solution:

1. To start off, create an AD Group for SharePoint administrators. We’ll use “SharePoint Server Admins” as the name.
2. Add the “SharePoint Server Admins” AD Group to the BuiltIn\administrators group on each server in the farm.

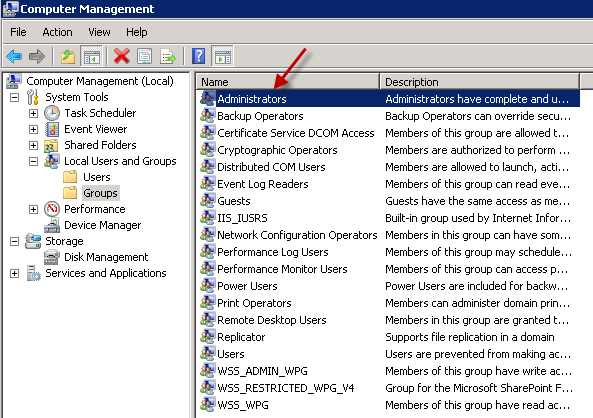
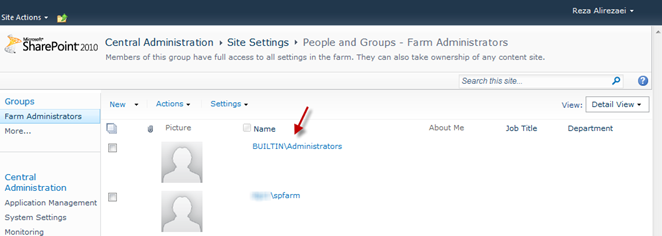
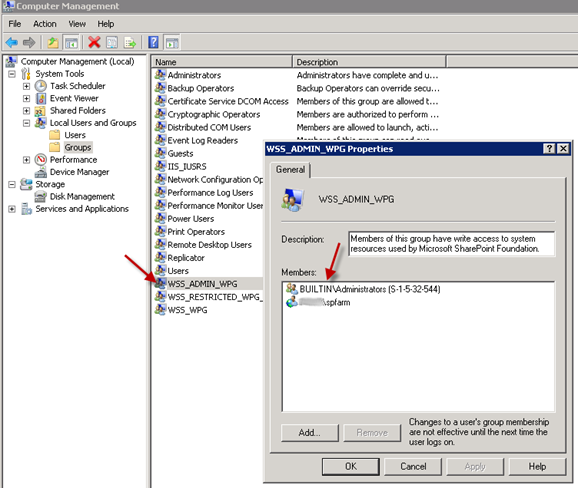
Note: the (BUILTIN\Administrators) group is already referenced in both the Farm Administrators group in Central Administration and the local WSS_Admin_WPG group as shown in the following two figures:

Central Administration Site > Security > Manage the farm administrators group

WSS_Admin_WPG group

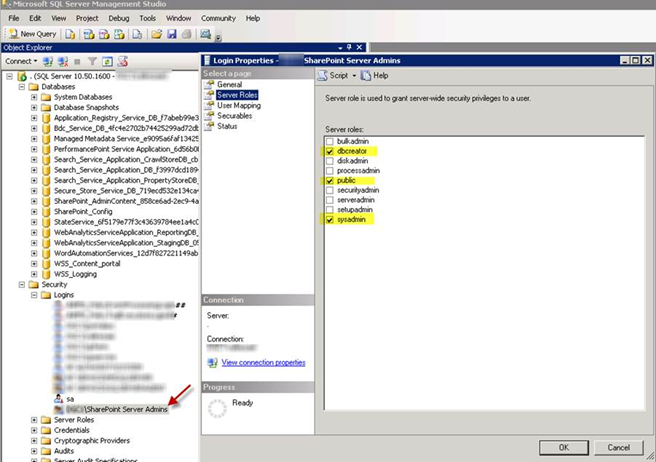
3. Open SQL Management Studio and add the “SharePoint Server Admins” group as a server login with dbcreator, public, and sysadmin server roles as documented here.

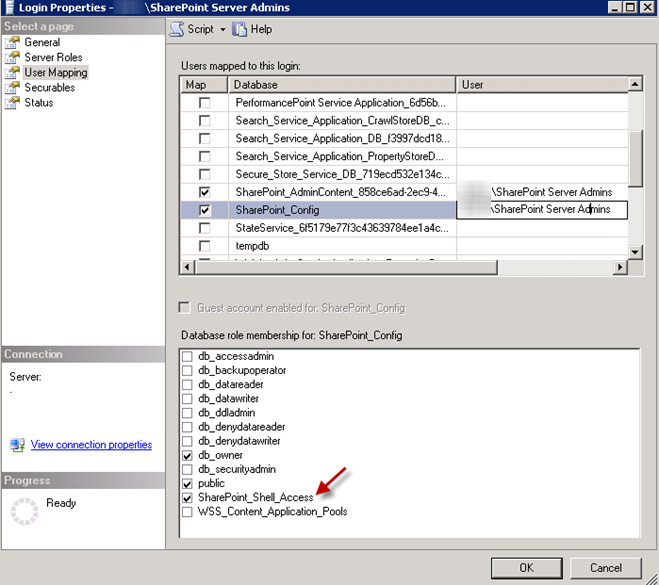
4. In the properties of the new SQL login created, go to he User Mappings section. In the mapped databases select the central administration and config databases and ensure that public and db_owner role memberships are checked. For the config database you will also want to select the SharePoint_Shell_Access role membership to give farm administrators the access to execute PowerShell against the farm.

5. Add the new farm admins to the “SharePoint Server Admins” AD Group.

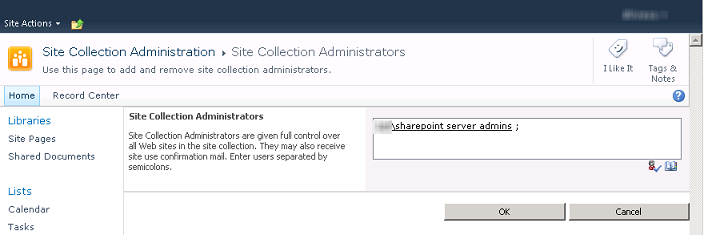
6. Additionally, if you want to give administrator access to the site collections created, add the “SharePoint Server Admins” group to the Site collection administrators of each site collection. Note that to add a domain security group in the site collection administration group in SharePoint Foundation 2010 you need to apply KB 2597136 which was just released today.


[Update 03/16/2012] As per Marco’s comment below, you can also add a user policy (Full Control) for each Web application if you want your SharePoint Server Admins group to access all site collections with the same set of permissions. See the instructions here.

Now we have successfully added a new AD Group to the SharePoint Farm Administrators, which this will allow us to add new users through one centralized location (AD). This makes adding users simpler by not having to add users individually to each of the places described above. Nice, easy, and centrally managed. Enjoy!

P.S. Below you will find some other related issues and workarounds:

http://sensoft2000-sharepoint.blogspot.com/2010/06/new-ribbon-icon-disabled-in-central.html
http://spdeveloper.net/2010/06/you-cant-create-web-applications-in-central-admin-even-if-youre-farm-admin/
http://social.msdn.microsoft.com/Forums/en-US/sharepoint2010general/thread/e1f3deee-75c1-402a-8e9f-6c5ff15796b7/
Categories: SharePoint 2010 Tags: