Quick Guide: Transitioning from BPOS to Office 365
1) First, make sure the transitioning process is completed and you have received an email from Microsoft confirming it. This is important!
2) Uninstall old BPOS SSO App from Control Panel > Programs > Uninstall a Program

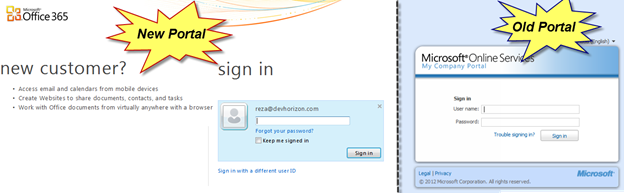
3) Login to https://portal.microsoftonline.com. This is the new URL for the company portal instead of the old URL.
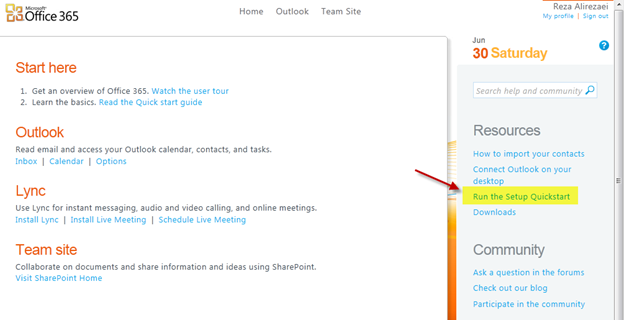
4) From the right navigation choose “Run the Setup Quick start”
5) Click on “on Your Computer” link on the top and then click on the “Run tool now” link on the bottom of the screen.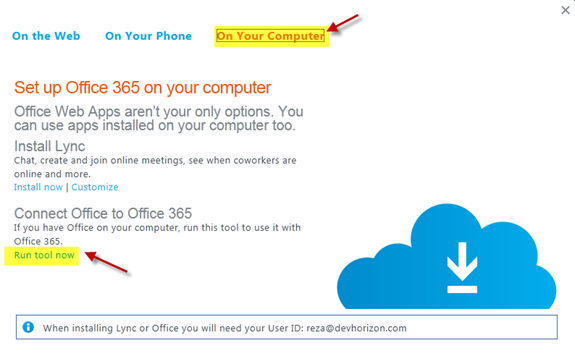
6) A click-once application will be deployed to your machine which will talk you through the installation, configuration and transitioning process of Office 365 on your desktop.
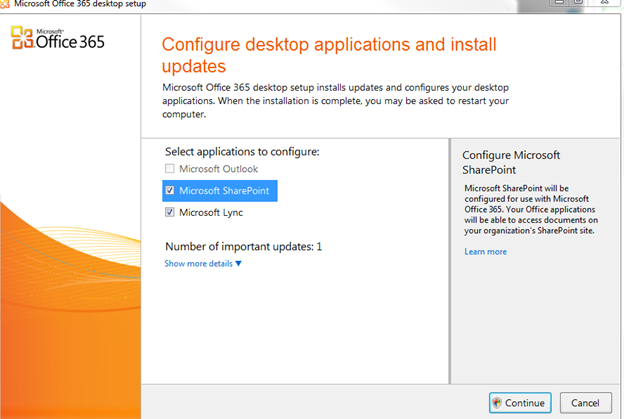
As you can tell, Outlook doesn’t need to be re-configured and the wizard will automatically switch your default BPOS-enabled email address to its Office 365 migrated one. All other non-default BPOS accounts must be configured manually.
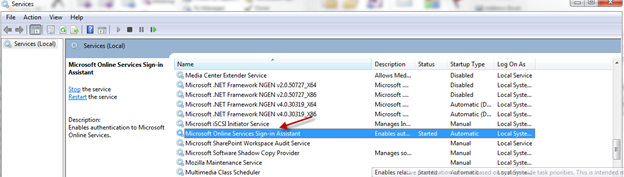
This wizard also installs “Microsoft Online Services Sign-in Assistant” in your computer: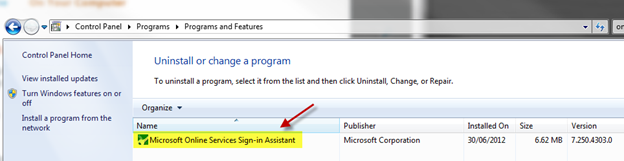
Note that unlike BPOS SSO App, Microsoft Online Services Sign-In Assistant is now a Windows Service.
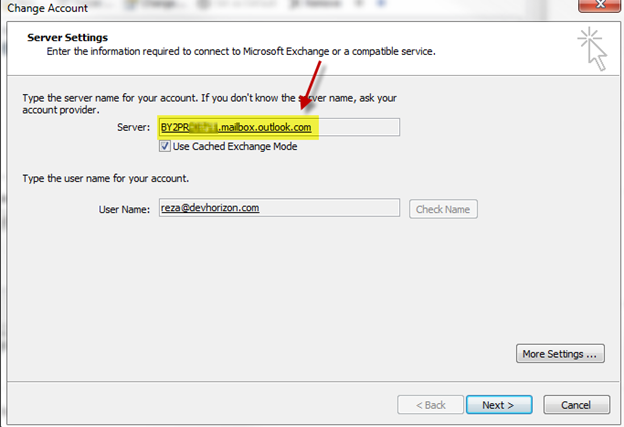
7) Once you have gone through all the steps in the wizard, open outlook and confirm your default email account has been switched to the new Exchange Server address:
You may also need to perform some manual steps to configure Outlook. See the official guidance here : http://help.outlook.com/en-US/140/ms.exch.ecp.useoutlookanywhere.aspx
If you have setup the CNAME record for outlook auto discovery, make sure you test your email auto-discovery here first, by choosing “Microsoft Office outlook Connectivity Tests” and then “outlook AutoDiscover” as shown below:

.8) If you have more than one email accounts, configure them manually through Control Panel > Mail > Email Accounts. Make sure you use the same server name (as shown in step 7) and proxy server settings automatically configured for your default account by the wizard.
9) Browse to http://mail.office365.com to verify your Outlook Web App is working fine. BPOS OWA should now look like cars from 1970s to you. doesn’t it?
10) One-time configuration by network admin: Prepare your domain for new Lync online as discussed here: http://onlinehelp.microsoft.com/en-us/office365-enterprises/hh416761.aspx
11) Browse to https://portal.microsoftonline.com again and click on My Profile link on the top right corner of the page. This where you update your contact information and upload your picture. Your picture must be under 100K and in JPEG format.

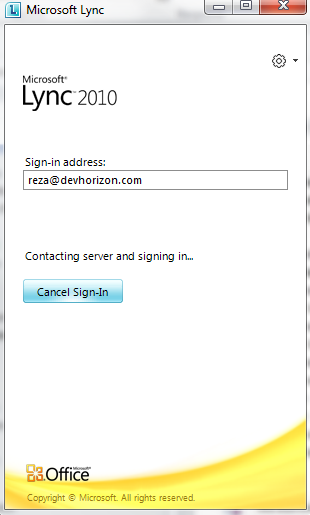
12) Open Launch Lync 2012 and enter your username. No additional steps is required:
That’s it! You are all set; enjoy all the new features of Office 365 on your desktop and your mobile device.
Check out my favorite features in Office 365 here.


Great post! That’s one of the things most people don’t consider when subscribing to a cloud service: how do I switch from one service to another? Is there any guidance on moving over your SharePoint and Exchange data from BPOS to Office 365? Does Microsoft move that over for you?
Thanks Eugene! All your Exchange and SharePoint data will be moved over. It’s strongly recommended to change gloabl admin passwords before the transition. Your SharePoint site will be accessible using the old URL , gotta love that 🙂 All you need to do is VISUAL UPGRADE and you are all set!