Working with Structured Data in Microsoft Office SharePoint Server 2007 (Part 4): SharePoint Designer
Summary: Explore different options you have to work with structured data in a high volume while you need to perform complex queries and actions against such data ranging from authoring, approval and landing information on Web Part pages, all the way down to physical storage. This blog post is part 4 of a blog post series that I am planning to write on this topic (31 printed pages).
Applies to: Microsoft Office SharePoint Server 2007, Microsoft Office SharePoint Designer 2007
See Also:
- Part 1 : Configuring Single Sign On Service and Database
- Part 2 : Exposing LOB Data
- Part 3 : Browser Enabled InfoPath Forms
Download this post in PDF version here.
Content:
- Introduction
- Create SQL data views
- Add formula and conditional formatting
- Master/Detail filtering using Web Part connection
- Master/Detail filtering across two pages via querystring
- Linked data sources
- Create your own Data Form Web Part
Introduction
Office SharePoint Designer 2007 allows you to smoothly integrate your information into a SharePoint site by giving you the ability to combine HTML design elements with the XSLT data transformation, all in a single design interface. It also offers an amazing support for the Data Form Web Part (a.k.a DFWP) that can be utilized to build rich, powerful forms much easier than ever. Data Form Web Parts can take advantage of sending additional input parameters either in query string or Web Part connections. This is extremely helpful to drive dynamic changes in the content that is surfaced on your SharePoint pages and experience an interactive interface using a composite no-code solution.
| Important |
| In WSS 2.0, the Data Form Web Part was known as the Data View Web Part (DVWP) or Data View. Data view is a representation of data from a data source. In WSS 3.0 , this Web Part was enhanced to not only allow you to view data , but provide you with the ability to insert, update and delete data from a variety of data sources, such as SharePoint data sources , database connections, Web services , RSS feeds and other type of XML files. |
Create SQL data views
In this section, you will learn how to create a Data Form Web Part that is connected to Microsoft SQL Server 2005 data. You will be also shown the flexibility of the Data Form Web Part to connect to multiple data repositories, display and aggregate such data consistently. Using the Northwind database (See Part1) is simple to begin the process of customizing a Dashboard view using DFWP. Data is surfaced real-time from the Northwind database to show how the Data View presentation will look as it is being designed.
1)Start SharePoint Designer.
2)Select the OpenSite option in the File menu.
3)Enter http://litwaredem in the Site name text box.
4)Click in the File menu , New and then from Page tab choose ASPX.
5)Save untitled.aspx as Products.aspx.
6)Select the Insert Data View option from the Data View menu.
7)Expand Database Connections in the Data Source Library pane and click Connect to a database..
.8)Click on the Configure Database Connection….
| Important |
| Database connections in DFWP can only use Sql authentication or SSO. Windows authentication works only when the database resides on the same machine asyour Windows SharePoint Services site. In this article, we will use SSO to connect to the Northwind database. |
9)Enter LITWAREDEMO (Replace LITWAREDEMO with your SQL Server name) in the Server Name box.
10)Choose Microsoft .NET Framework Data Provider for SQL Server in the Provider Name dropdown.
11)Under Authentication, click Use Single Sign-On authentication, and then click Settings.
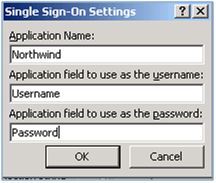
12)In the Single Sign-On Settings dialog box, do the following:
- In the Application Name box, type Northwind.
- In the Application field to use as the user name box, type Username.
- In the Application field to use as the password box, type Password.
- Click on the Ok button.
13)Click Next.
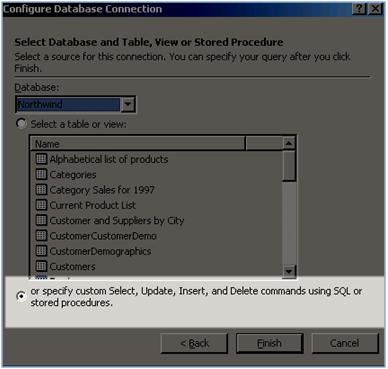
14)Choose Northwind from the Database dropdown box.
15)From select a table or view, click on Products and then click on the Finish button.Note that in DFWP,Instead of working with tables or view directly, you could also specify a SQL statement or stored procedure in Configure Database Connection dialog box.
16) Click on the OK button to close Data Source Properties dialog box.
Add formula and conditional formatting
In the previous section , we successfully created the Products view and now we want to surface it onto a page , add a Formula Column to show the total inventory value (UnitPrice * UnitsInStock) and a conditional formatting that turns a Product row into red for low inventory.
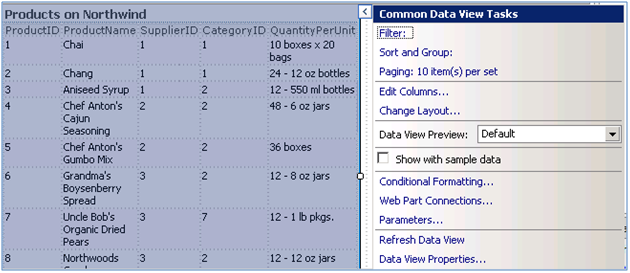
1)Expand Database Connections in the Data Source Library pane.
2)Click on Products on Northwind and select the Show Data option.
3)Drag the selected fields in to the Data View on the design surface. SharePoint designer inserts DataFormWebPart onto the page to contain Northwind products. Right-click the CategoryID and select Delete Columns.
4)Change ProductID text to ID.
5)Change ProductName text to Product Name.
6)Change ProductName text to Supplier Info.
7)Change QuantityPerUnit text to Quantity Per Unit.
.8)Click on the fly out button for the Data View Web Part.
9)Click on the Paging link and select the Limit total number of items displayed to option.
10)Set the limit to 5.
11)Click the Ok button.
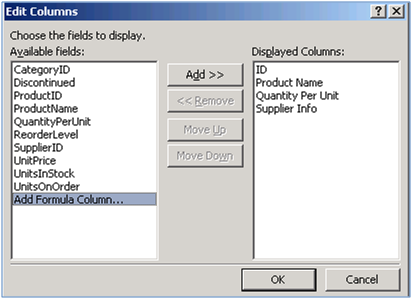
12)Click on the Edit Columns…., then from Displayed Columns choose Supplier Info.
13)Click on Move Down.
14)Select Add Formula Column…
15)click Add >> to launch the XPath Expression Builder.
16)Double click or drag and drop UnitsPrice on the data tree.
17)Click to the right of UnitPrice in the Edit XPath Expression. Type “*” and then use the data aware IntelliSense to select UnitsInStock. Notice the live preview area towards the bottom of the dialog.
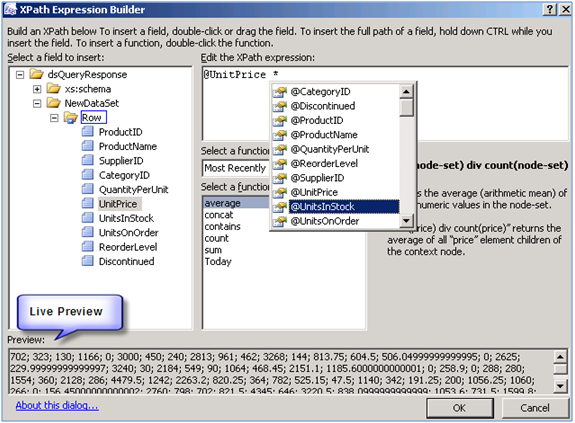
18)Click OK in the XPath Expression Builder dialog.
19)Click on the Supplier Info and click the Move Down button.
20)Click OK Edit Columns dialog.
21)Switch to “Split View” by clicking the Split tab at the lower left of the design surface. In the “Design View” half, highlight the text that says “UnitPrice * UnitsInStock“. Notice the granular selection within the XSLT in “Code View”. Delete this text and type the words “Inventory Value.”
22)Return to “Design View” by clicking the Design tab at the lower left of the design surface.
23)Add conditional formatting to highlight low inventory
24)Click next to one of the data values in the first row of your view. Using the Quick Tag Selector, select the whole row by clicking the TR button.

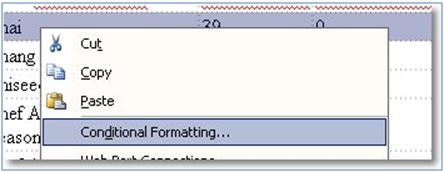
25)Right click on the highlighted row and select Conditional Formatting…
26)In the Conditional Formatting task pane, click Create and select Apply Formatting.
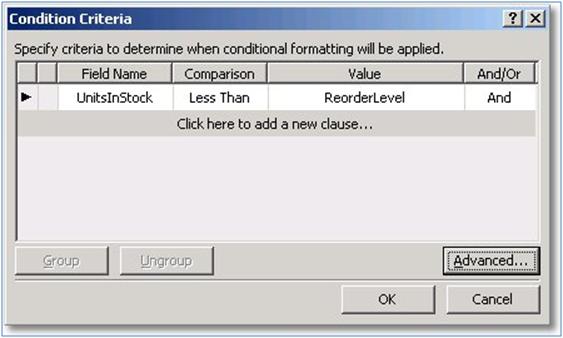
27)Click on the Click here to add a new clause… area to open the Condition Criteria dialog.
28)Click on the Advanced… button to open the Advanced Condition dialog.
29)In the Edit the XPath expression section type: UnitsInStock < ReorderLevel.
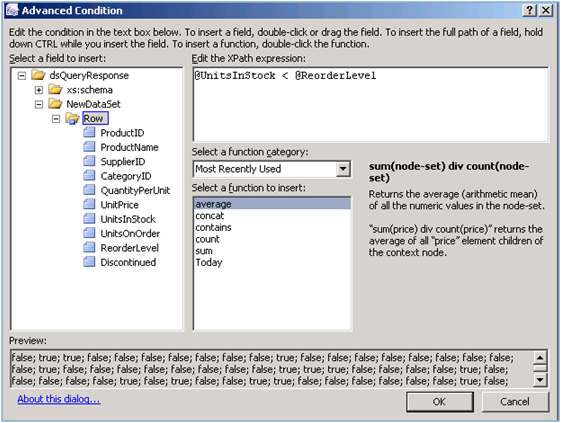
30)Click OK in the Advanced Condition dialog.
31)Click OK in the Condition Criteria dialog.
32)The Modify Style dialog will appear, in the Category list, click Background.
33)Set background-color to ” #FF6666″.
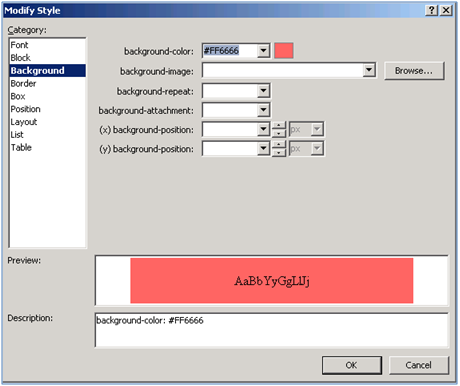
34)Click OK.
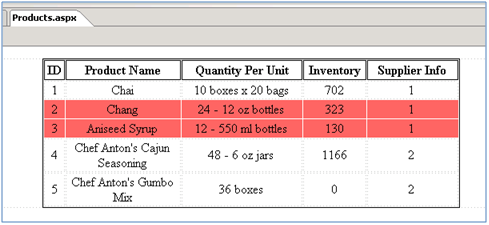
35)Open Internet Explorer and browse to http://litwaredemo/products.aspx.

Master/Detail filtering using Web Part connection
Master/Detail data presentation is a common type of functionality in many applications for implementing one-to-many relationships , such as a report showing all of the products and then allowing users to select a particular product and display its supplier. In this section , we are going to build a master/detail relationship between two Web Parts sitting on the same page.
1)Start SharePoint Designer.
2)Select the OpenSite option in the File menu.
3)Enter http://litwaredem in the Site name text box.
4)Click on the products.aspx page we created in the previous section.
5)Switch to “Design” by clicking the Design tab at the lower left of the design surface.
6)Expand SharePoint Lists in the Data Source Library pane and click on the Supplier List.
7)Drag and drop the Suppliers List onto the design surface.
8)Click on the fly out button for the Suppliers List Data Form Web Part.
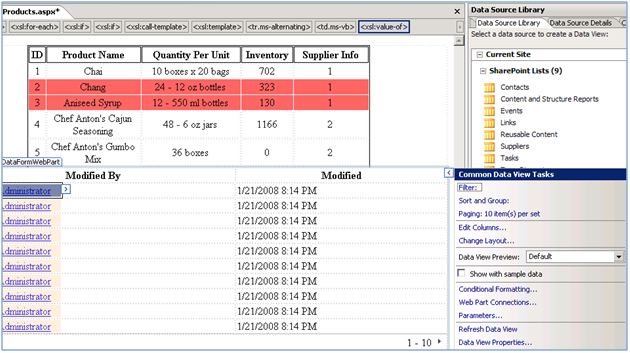
9) Click on the Edit Columns…., then from Displayed Columns choose Modified By andModified..
10)Click on the Remove Button.
11)From the Available fields list ,choose SupplierID, CompanyName,ContactName and phone.
12)Click Ok.
13)Click on the fly out button for the Products Data Form Web Part.
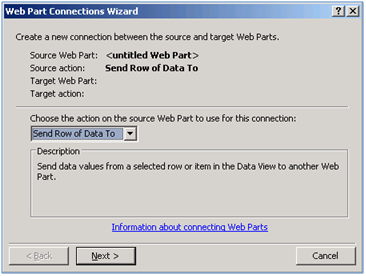
14)Click on the Web Part Connections……
15)Select Send Row of Data To from the dropdown box and click Next.
16)Select Connect to a Web Part Page on this page. Click Next.
17)Target Web Part must be Suppliers (because there is no other Web Part to connect to).
18)Leave target action intact (Get Filters Values From). Click Next.
19)From the Inputs to Suppliers columns select Supplier ID and map to SupplierID in the Columns in <Untitled Web Part>. Click Next.
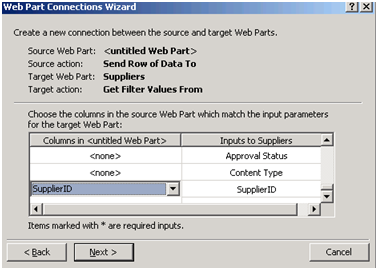
20)From Create a hyperlink on dropdown box , select SupplierID and click Next.
21)Click on the Finish button.
22)Switch to “Split View” by clicking the Split tab at the lower left of the design surface. In the “Design View” half, highlight the one of the columns below Supplier Info heading.
23) Replace the selected XSLT code with the word “View”.
24)Save Products.aspx page.
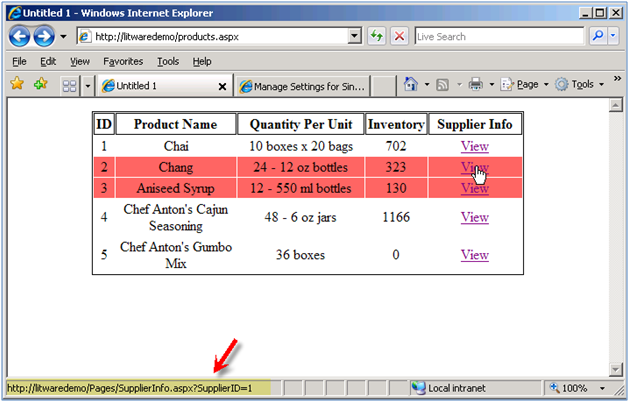
25)Open Internet explorer and browse to http://litwaredemo/Products.aspx.
26)Click on the View link for each product. Notice how Suppliers list will be filtered to show information only about that product’s supplier.
Master/Detail filtering across two pages via query string
A common pattern in many web applications is to have the master records on one web page and details shown on another . In this section , we will implement this pattern and build a master/detail filtering with master records coming from Northwind database and detail record(s) filtered in Suppliers List (See Part 1) sitting on another page.
1)browse to http://litwaredemo.
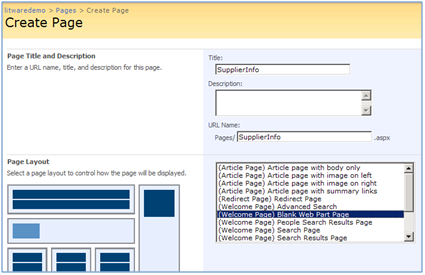
2)Click on the Site Actions and choose Create Page.
3)In the title box, type SupplierInfo and choose (Welcome Page) Blank Web Part Page as the Page Layout. Click on the Create button.
4)Add the suppliers list view Web Part to the Center zone.
5)Add the Query String (URL) Filter Web Part to the center right zone.
6)Go to Query String (URL) Filter Web Part properties and in Query String Parameter Name text box, enter SupplierID
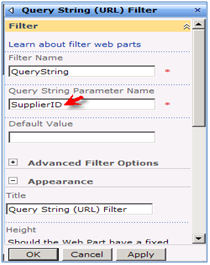
7)Click Ok.
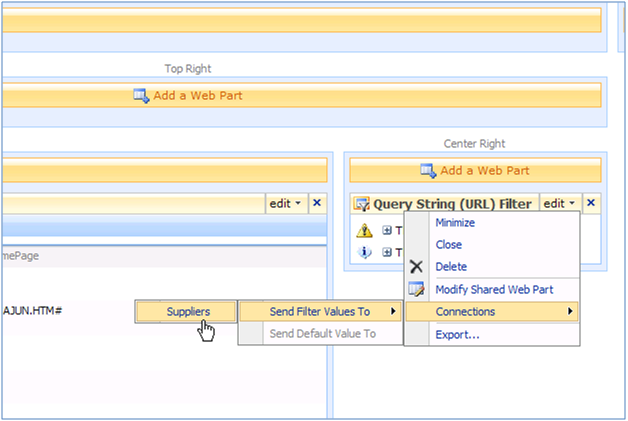
.8)Click on the edit menu on the Query String(URL) Filer Web Part , click on Connections ,Send Filer Value To and Choose Suppliers.
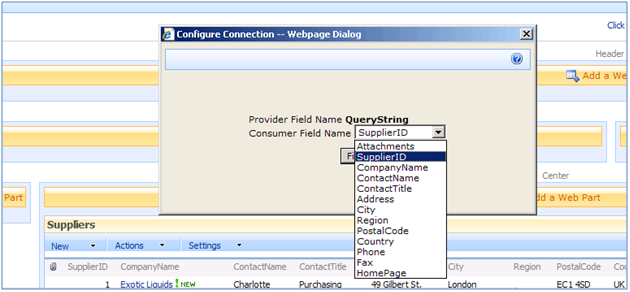
9)Configure Connection dialog box will appear.
10)Choose SupplierID from the Consumer Field Name dropdown box.
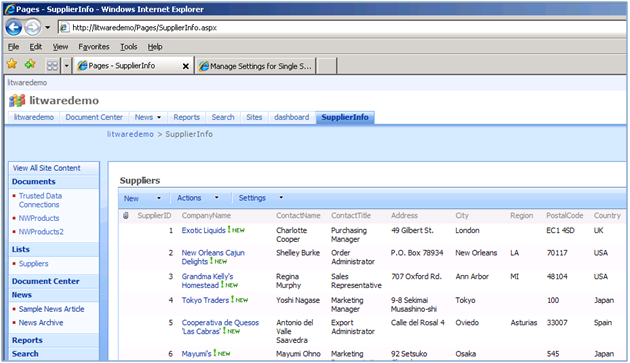
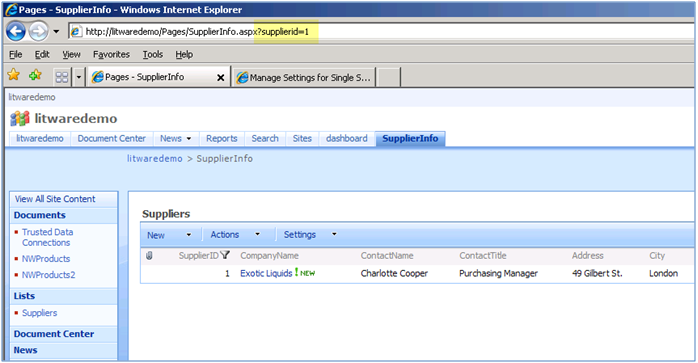
11)Click on the Publish button , SupplierInfo.aspx without the query string shows all the suppliers.
12)Test the filtering on SupplierInfo.aspx page by browsing to the page , passing along supplier’s SupplierID in the query string.
12)With the filtering working properly in the detail page(SupplierInfo.aspx), let’s get back to the Products.aspx and modify the Data Form Web Part to pass the supplier’s SupplierID in the query string.
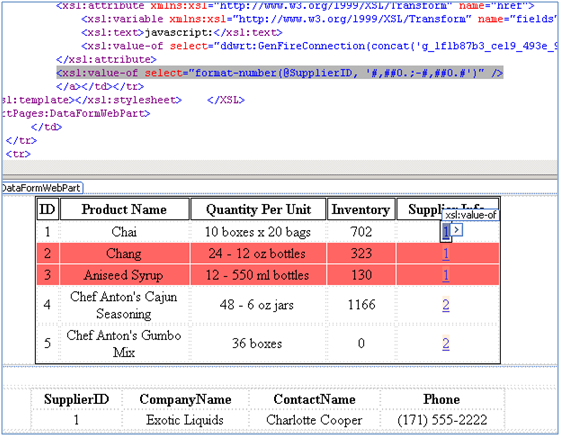
13)In the products.aspx page , we need both static and data-driven values. /Pages/SupplierInfo.aspx?SupplierID portion of the link’s URL is static, whereas the SupplierID portion is data-driven as its value is each row’s own SupplierID.
14)Switch to “Split View” by clicking the Split tab at the lower left of the design surface. In the “Design View” half, Click next to one of the data values of the Supplier Info column in the first row of your view.
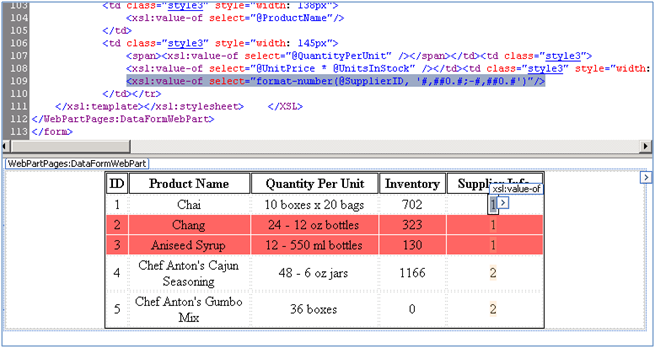
15) Replace the highlighted XSLT with the following:
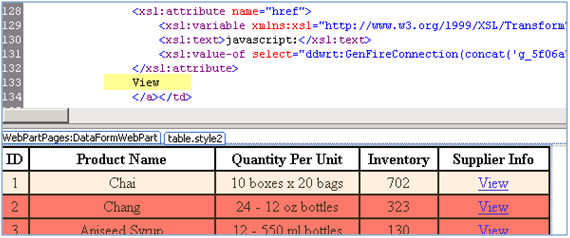
- <a target="_self">
- <xsl:attribute name="href">
- <xsl:variable xmlns:xsl="http://www.w3.org/1999/XSL/Transform" name="fields">SupplierID=
- <xsl:value-of select="ddwrt:ConnEncode(string(@SupplierID))">
- </xsl:value-of>
- <xsl:text>/Pages/SupplierInfo.aspx?</xsl:text>
- <xsl:value-of select="$fields"></xsl:value-of>
- </xsl:variable> View
- </xsl:attribute>
- </a>
16)Save Products.aspx page.
17)Open Internet explorer and browse to http://litwaredemo/Products.aspx. Notice how correct query string built based on the SupplierID of the product.
Linked data sources
Most enterprises store different types of data in various data stores with different data models. The challenge here is how to provide a complete and easy view into all this data sitting in various stores. It’s a common practice to use Microsoft Office SharePoint Designer 2007 to link these data sources .By doing so; you can create a single data source that can be treated like any other data source available in Data Source Library. The beauty of process is that You can link data sources of separate types, for example, you can link an SharePoint list to a table which resides in SQL database as long as linked data sources contain data that can be interrelated to each other.
1)Start SharePoint Designer.
2)Select the Open Site option in the File menu.
3)Enter http://litwaredem in the Site name text box.
4)Click in the File menu , New and then from Page tab choose ASPX.
5)Save untitled.aspx as LinkDS.aspx.
6)Expand Linked sources in the Data Source Library pane and click Create a new Linked Source…
7)In the Data Source Properties dialog box, click on the Configured Linked Source…
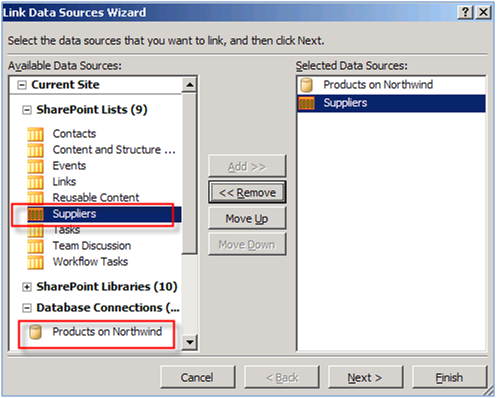
.8)Link Data Sources wizard will open.
9)From Available Data Sources list, select Products on Northwind and Suppliers list. Click Next.
10)Select the option to join the contents of the data sources. Click Next.
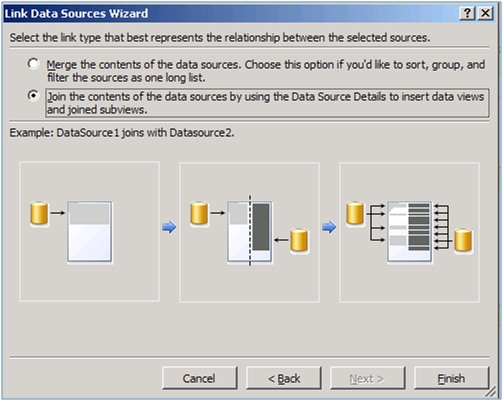
11)Click Finish.
12)Click on the General Tab and type a name of the new linked data source , for example SupplierProductsDS.
13)Click Ok.
14)Click on SupplierProductsDS and select the Show Data option.
15)In the tree view , highlight CompanyName in the Suppliers data source.
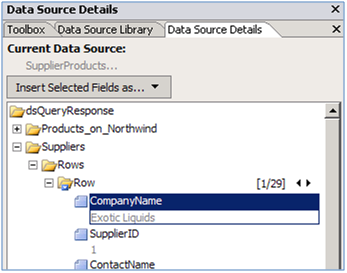
16)Drag and drop this field on to the design surface.
17)Delete the CompanyName title. Your design surface should look like this:
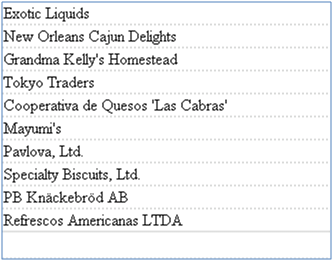
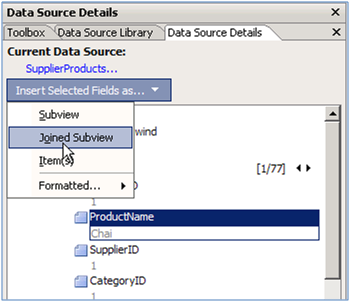
18)Click next to one of the data values in the first row of your view – for example “Exotic Liquids“, and now in the Data Source Details Pane, Select ProductName from Products_on_Northwind data source.
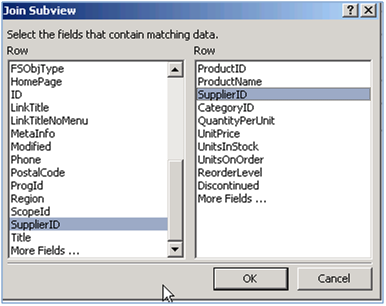
19)Click on Insert Selected Fields as… and choose to insert as “Joined SubView” in the menu shown below:
20)Specify SupplierID from left list and SupplierID from right list to be the join columns for both data sources.
21)Your design surface should look like this:
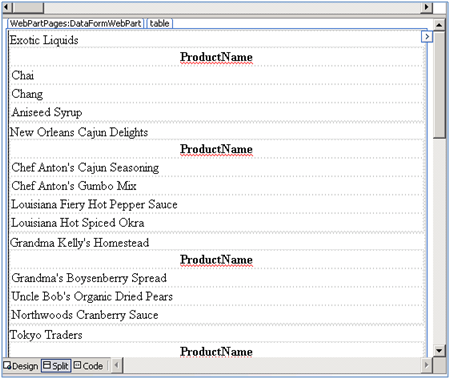
22)Change the ProductName to Products.
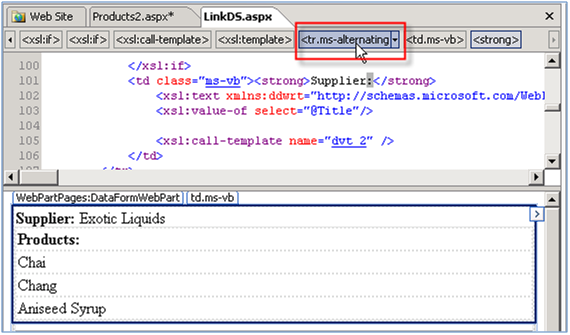
23)Click on the left side of one of the data values in the first row of your view – for example “Exotic Liquids“.
24)Type “Supplier:” and make it bold.
25)Click next to one of the data values in the first row of your view. Using the Quick Tag Selector, select the whole row by clicking the TR button.
26)Paste <tr><td><hr/></td></tr> right after this TR ends. This will add a line between each supplier.
27)Save LinkDS.aspx.
28)Open Internet explorer and browse to http://litwaredemo/ LinkDS.aspx.
Create your own Data Form Web Part
In nutshell, Data Form Web Part is just an XSLT-rendering Web Part that receives its data in xml format from a Data Source Control. Most of the time , people use Microsoft SharePoint Designer 2007 to create Data Form Web Part or even for deploying it, but the truth is, SharePoint Designer is not the only way you can benefit from all the great things, Data Form Web Part offers to get data on the page with minimal effort and coding! Imagine this: a WebPart that you can just drag and drop on a page, set couple of properties and it renders the data from your backend system . Picture this: you can completely change the look and feel of your Web Part by editing its associated XSL stylesheets . I am not going to walk you through a full-blown custom Data Form Web Part here. Instead, I’d like to demonstrate how easily you can create a generic one and I will leave the specific implementation up to you.
| Important |
| Unless you have not noticed so far, many of the out of the box Web Parts are derived from Data Form Web Part – for example, RSS Web Part, Business DataList Web Part and Business Data Related Web Part . |
In order to create a generic Data Form Web Part, there are only three properties that matter the most:
- Data Source.
- XSL Stylesheets.
- Parameter bindings.
When you inherit your Web Part from Microsoft.SharePoint.WebPartPages.DataFormWebPart class, you will automatically get the XSLT and Parameter bindings properties along with bunch of other properties specific to Data Form Web Part. Having said this, all we need to do in our generic Data Form Web Part is to expose the data source as a custom property, hook it up to DataSourceString property of Data Form Web Part and then call the DataBind method at runtime. Let’s get this Web Part coded:
1)Start Visual Studio.
2)Create a new Class Library project and name it DFWP.
3)Add a new class and name it DFWPx.cs.
4)Make that class inherit from Microsoft.SharePoint.WebPartPages.DataFormWebPart.
5)Add a property to the class and name it GenericDataSource. This is the property that appears in the Web Part’s properties and gives you the ability to type the data source at runtime.
[CSharp]
private string genericDataSource;
[WebBrowsable(true)]
[DefaultValue(“”)]
[WebDescription(“Enter the data source for this Data View Web Part”)]
[WebDisplayName(“DataSource”)]
[Personalizable(PersonalizationScope.Shared)]
[Category(“Data Source”)]
[ReadOnly(false)]
public string GenericDataSource
{
get
{
return genericDataSource;
}
set
{
genericDataSource = value;
}
[/CSharp]
6)Override the OnInit method and copy and paste the following code snippet into this method:
[CSharp]
protected override void OnInit(EventArgs e)
{
base.OnInit(e);
if (! string.IsNullOrEmpty(this.GenericDataSource))
{
BuiildGenericDataSource();
this.DataBind();
}
}
[/CSharp]
7)Add the following helper method to your class:
[CSharp]
private void BuiildGenericDataSource()
{
string registerTagPrefix = “<%@Register TagPrefix=\”sharepoint\” Namespace=\”Microsoft.SharePoint.WebControls\”
Assembly=\”Microsoft.SharePoint, Version=12.0.0.0, Culture=neutral, PublicKeyToken=71e9bce111e9429c\” %>”;
this.DataSourcesString = string.Concat(registerTagPrefix, this.GenericDataSource);
}
[/CSharp]
Source code for this class can be download at https://blogs.devhorizon.com/reza/wp-content/uploads/2008/03/DFWPx. rar .
.8)Compile the project and deploy the Web Part (Deployment steps are not covered here).
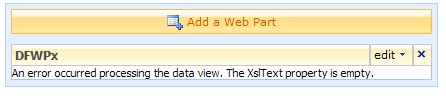
9)For the first time , we you add the Web Part to a zone, you get an error like what is shown below. It is just complaining that there is no XSLT. Move on to the next step.
10)Click on the edit menu on the Web Part and select Modify Shared Web Part.
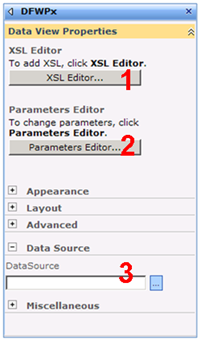
11)This will open DFWPx Web Part’s properties pane. Notice our custom DataSource property shown underneath Data Source section. In the properties pane, you need to change three properties as marked in the picture below:
12)Open the LinkDS.aspx page we created in the previous section in Microsoft SharePoint Designer 2007. What we are going to do here , is one of the many example that Microsoft SharePoint Designer 2007 can make you life much easier both as developer or non-developer.
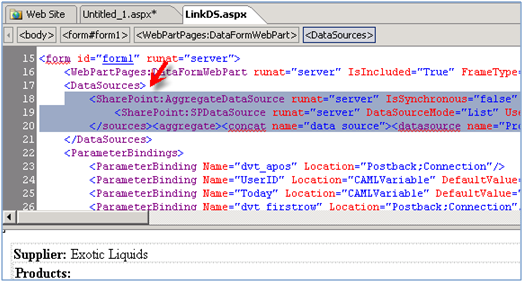
13)Switch to “Split View” by clicking the Split tab at the lower left of the design surface. In the “Design View” half, click next to the first row. In the “Code View”, locate <XSL> tag and highlight the whole <xsl:stylesheet> tag. Copy it to the clipboard.
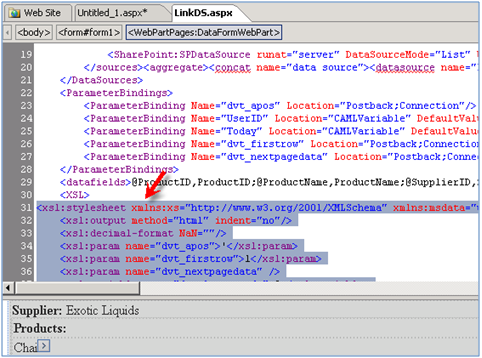
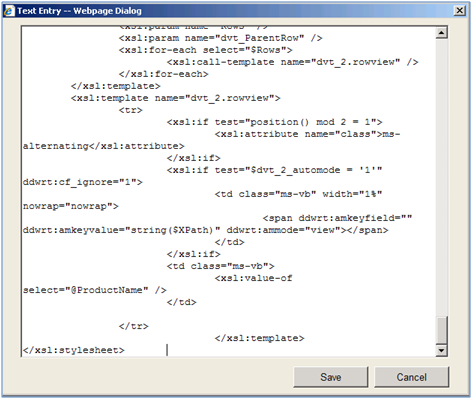
14)In the Web Part’s properties pane, click on the XSLT Editor… and paste it in the text entry dialog box. Click Save.
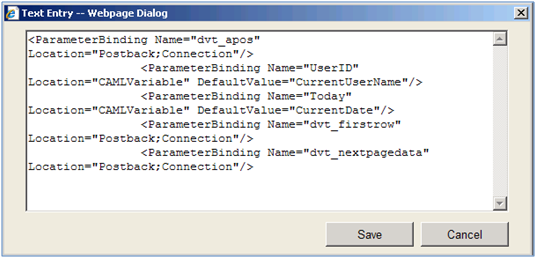
15) Back to SharePoint designer. This time , locate <ParamtereBindings> tag and copy and paste the content into the clipboard.
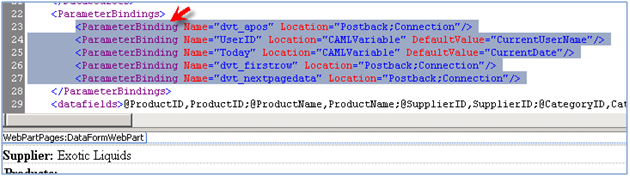
16)In the Web Part’s properties pane, click on the Parameters Editor… and paste it in the text entry dialog box. Click Save.
17) This time in SharePoint designer, locate <DataSources> tag and copy and paste the content.
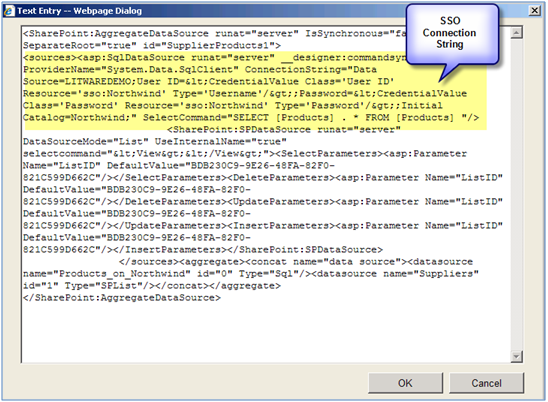
18)In the Web Part’s properties pane, underneath Data Source section click on the … next to DataSource text box
19) Paste it in the text entry dialog box. Notice the SSO connection string that SharePoint Designer has generated. Click OK.
20)Click Ok in the properties page (You may not see the result yet).
21)Click Publish on the page toolbar. Here is the result.
22)Paginate through the result to make sure it works properly.
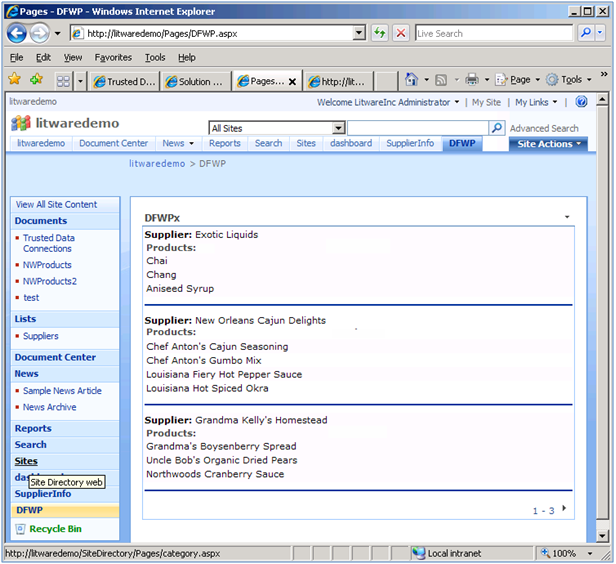
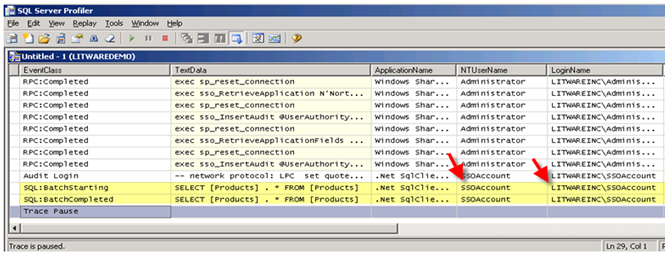
23)If you start up a new trace in the SQL Server Profiler and monitor SQL:BatchStarting and SQL:BacthCompleted events, you will see how Litwareinc\administrator (the account that was browsing to the DFWP page shown in the picture above) is mapped to the Litwareinc\SSOAccount which was set up as SSO account in Northwind Application definition.


i want same steps on following points
1. accept data from user
2. save it to sql server 2005
3. then show report
You showed is a kind of reporting , i want data entry
waiting for responce
Helpful info in addition
– XPath problem fix for a linked data source from another site:
instead of:
<xsl:variable name=”Rows” select=”../../../Member_Directory/Rows/Row[…
put:
<xsl:variable name=”Rows” select=”/dsQueryResponse/Member_Directory/Rows/Row[
Should be something like that: